This repository contains generated files and a checksum.
If you find yourself unable to import your repository due to the presence of files edited outside an instance of ServiceNow, merge commits that mix files from different revisions, or other data that does not match the checksum, you may recover using either of the following techniques:
Remove the problem commits:
Clone your repository to a personal computer with the git command line tools installed and open a git command prompt in the repository root
Run git log and take note of the SHA1s of the problem commits
Build revert commits using git revert SHA1 repeatedly, working backward in time, for each commit that introduced changes not generated by a ServiceNow instance
Run git push
Overwrite the problem code snapshot with a known good one:
Clone your repository to a personal computer with the git command line tools installed and open a git command prompt in the repository root,
Locate a known good code snapshot and record its SHA1. For this step, git log can be useful.
Run git reset --hard SHA1 to a commit that was generated by a ServiceNow instance
Run git reset HEAD{1}
Run git add -A
Run git commit
Run git push
Notes on dependencies
Dependencies will not show up in the list of changes but will be exported/imported
It is your responsibility to resolve the dependencies before installing an application. ServiceNow source control will not manage these for you. In case you installed an application before installing its dependencies:
2.1 Delete the application
2.2 Activate/install all required dependencies
2.3 Re-import the application from source control
Currently listed dependencies:
Simple component helpers to support LaunchDarkly in your react app.
Installation
npm install --save react-launch-darkly
Dependencies
React v16.3.0 or greater
If you use an older version of React, you can continue to use version 1.4.0 of this library. However, we will no longer be actively maintaining version 1.x.
Then in your lower-level components, to make use of the FeatureFlag component:
// Home.jsimportReact,{Component}from"react";import{FeatureFlag}from"react-launch-darkly";exportdefaultclassHomeextendsComponent{render(){return(<div><FeatureFlagflagKey="home-test"renderFeatureCallback={this._renderFeature}/></div>);}_renderFeature(){return(<div>Your new feature!</div>);}}
Note that this component has to be rendered as a child of LaunchDarkly
props
flagKey : string (required)
The flagKey prop is the feature flag key you defined in LaunchDarkly.
renderFeatureCallback : function (required)
The main callback function that renders your feature. In typical scenarios where your flag is a boolean,
you can simply create your function to return the necessary JSX:
// Example FeatureFlag component<FeatureFlagflagKey="example"renderFeatureCallback={this._renderFeature}/>// Callback function_renderFeature(){return(<div>New Feature Here!</div>);}
Multivariate Flag Support
When using a multivariate feature flag, the renderFeatureCallback prop will pass the value of
the flag as an argument to your callback function:
// Example FeatureFlag component<FeatureFlagflagKey="multivariate-example"renderFeatureCallback={this._renderFeature}/>// Callback function with feature flag value passed in_renderFeature(featureFlagValue){if(featureFlagValue==="A"){return(<div>Bucket "A" Feature!</div>);}return(<div>Default Bucket Feature Here!</div>);}
initialRenderCallback : function (optional)
Since the feature flags are requested from LaunchDarkly after DOM load, there may be some latency in the rendering. This render callback allows you to provide some sort of feedback to indicate loading, e.g., the typical spinning loader.
renderDefaultCallback : function (optional)
This callback is provided for cases where you want to render something by default, think of it when your feature flag is “off” or falsy.
SSR Support
SSR is opt-in and you need to specify the initial set of feature flag keys and values through
the bootstrap property on clientOptions:
What this gives you is that on SSR, we use the set of feature flags found on bootstrap to render
your FeatureFlag component. When your FeatureFlag component is mounted, it will then initialize
the LaunchDarkly js-client and make the proper XHRs to LaunchDarkly to populate the available
feature flags within js-client’s internal state. Thus taking precedence over the feature flags
present in bootstrap.
In the event that you opt-in for SSR, you may not want to make any additional XHRs to LaunchDarkly
since you already have the feature flags provided from your server through bootstrap, you can
disable this by supplying disableClient: true:
If you need to temporarily override the variation reported by a feature flag for
testing or demonstration purposes, you can do so using special query parameters
in the request URL. This can be useful for seeing the possible effects of
enabling a feature flag or to force a specific variation of a multivariate flag.
Do note that overriding a feature flag does not report it to LaunchDarkly nor does it persist.
It’s merely a mechanism for testing or demonstration purposes. One notable use-case is in
integration and/or end-to-end testing.
Enabling Boolean Feature Flags
You can enable a set of boolean feature flags with a comma-delimited list in the
features query parameter:
// Overrides the `send-onboarding-email` boolean feature flag, setting it to `true`
http://localhost/users?features=send-onboarding-email
// Enables the `show-user-email`, `user-nicknames`, and `hide-inactive-users` feature flags
http://localhost/users/101?features=show-user-email,user-nicknames,hide-inactive-users
Advanced Feature Flag Overriding
If you need to temporarily set a boolean feature flag to false or override the
variation reported by a multivariate feature flag, you can use
features.{feature_flag} query parameters:
// Disables the `verify-email` feature flag and sets the `email-frequency` variation to "weekly"
http://localhost/users?features.verify-email=false&features.email-frequency=weekly
The values “true” and “false” are converted into true and false boolean
values. If the query parameter value is omitted, then the feature flag will be
reported as enabled:
// Enables the `show-user-email` feature flag
http://localhost/users/101?features.show-user-email
Examples
// Overrides the `send-onboarding-email` boolean feature flag, setting it to `true`
http://localhost/users?features=send-onboarding-email

// Enables the `show-user-email`, `user-nicknames`, and `hide-inactive-users` feature flags
http://localhost/users/101?features=show-user-email,user-nicknames,hide-inactive-users

// Disables the `verify-email` feature flag and sets the `email-frequency` variation to "weekly"
http://localhost/users?features.verify-email=false&features.email-frequency=weekly

// Enables the `show-user-email` feature flag
http://localhost/users/101?features.show-user-email
Identify a new user
If you need to change the configured user for the launch darkly client you can do that by calling identify.
import { identify } from "react-launch-darkly";

identify(launchDarklyClientKey, launchDarklyUser, optionalUserHash);
See Launch Darkly’s documentation for more information.
This is the README for “adt-manager”. This extension allows users to create adt workspaces enabling the editing of Azure Digital Twin Models
Getting Started
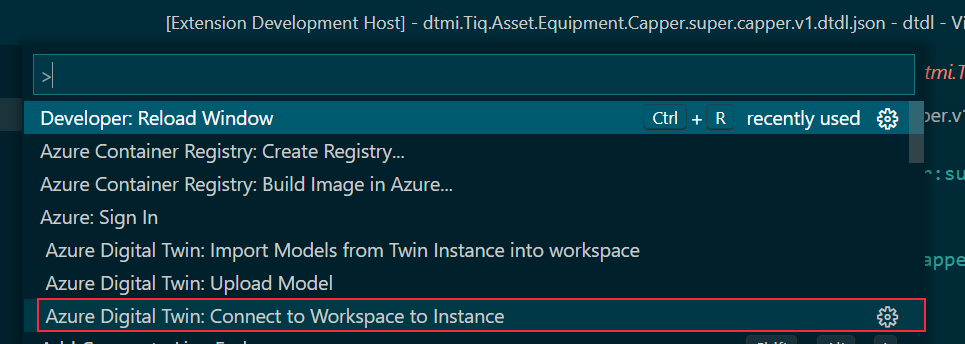
1. Connect to an Azure Digital Twins Instance
Please Ensure you have run the Azure Signin Command before using this extension.
Press F1 and Select ‘Azure Digital Twin: Connect to Workspace to Instance’ this will provide you with a list of Azure Digital Twin Instances.
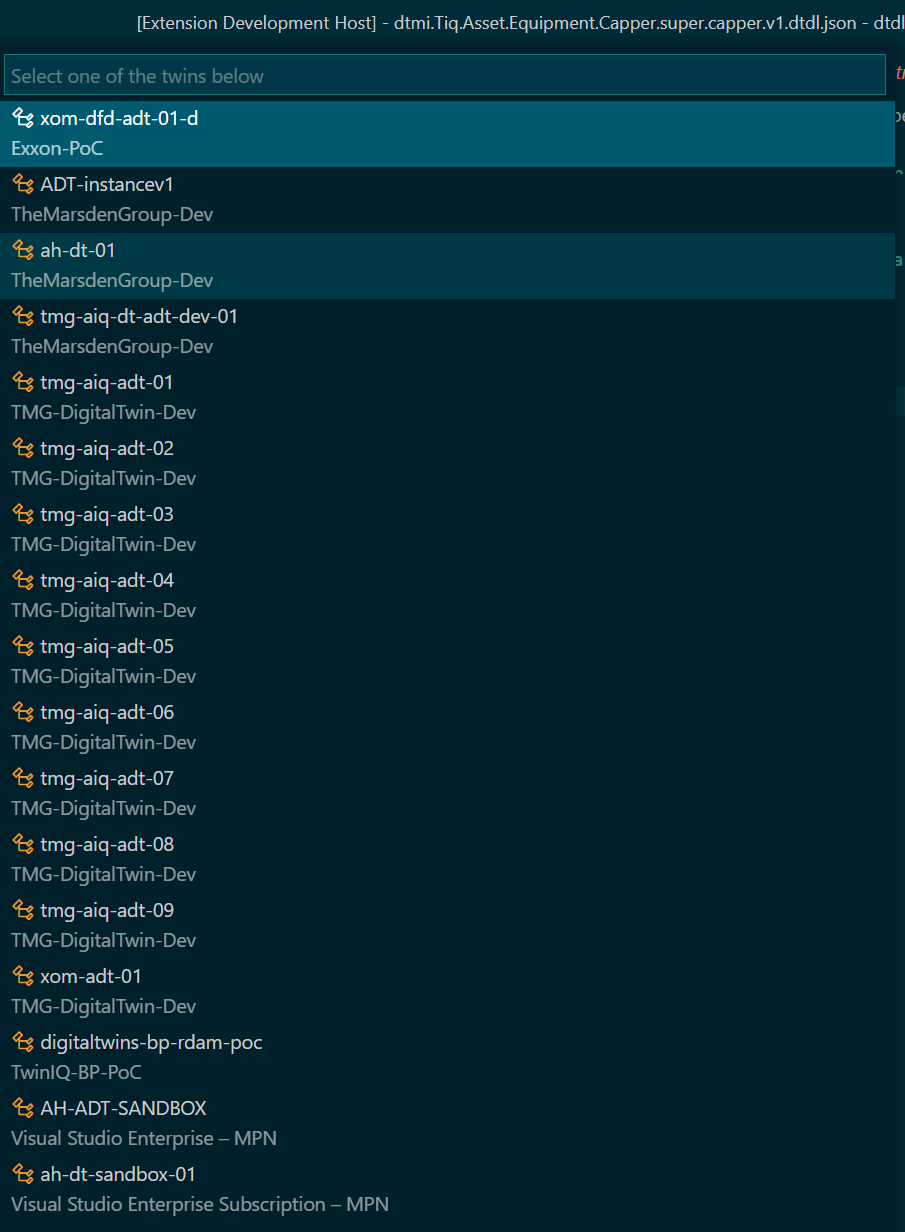
Select one of the instances.
Upon selecting an instance vscode will then download all of the models the instance selected plus a .adt-workspace file which enables vscode to connect in future without going through the selection process.
if you don't see the Azure Digital Twins Instances you expect, try pressing F1 and selecting "Azure Signin"
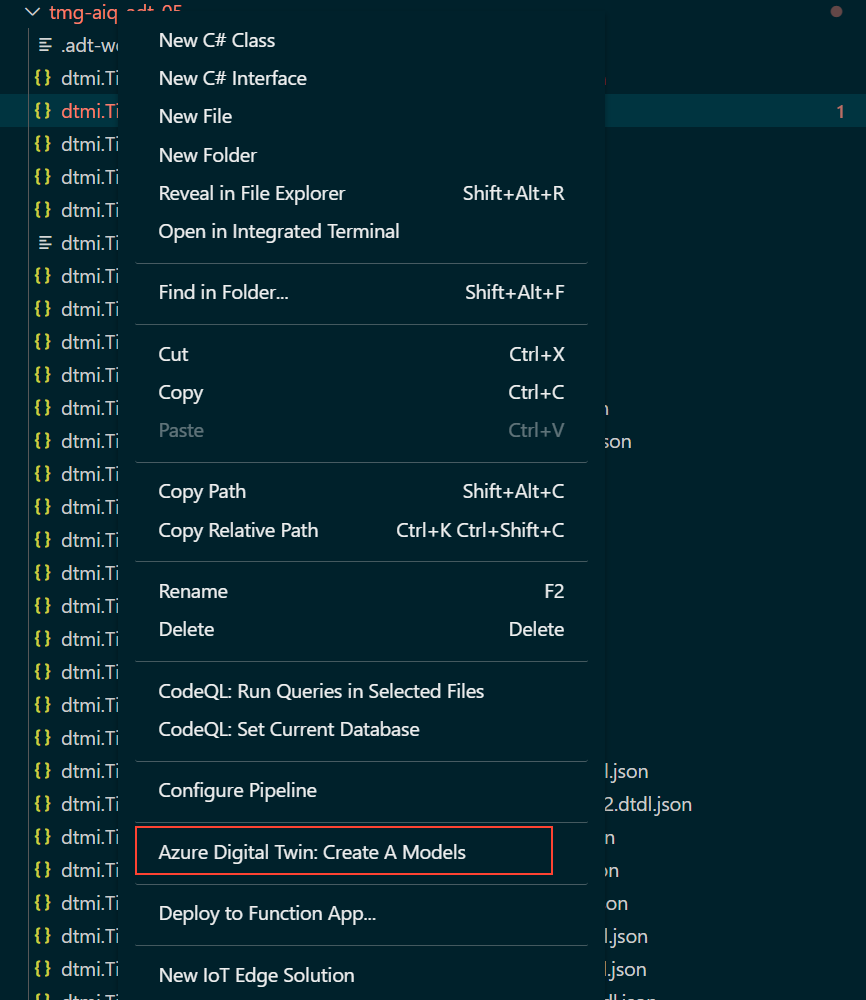
2. Create A Model
In the Explorer Menu on the left, right click on a directory and select “Create a Model”, this will prompt for a model name and a model id. it will then create a dtdl.json file ready for editing.
3. Upload A Model
In the Explorer Menu, right click on a Model and select “Upload Model” this will then upload that model to the Twin Instance configured the .adt-workspace file within the same directory.
It will then check to see if the model already exists, if it does it will offer to automatically decomission the existing model and upload the new one incrementing the version number.
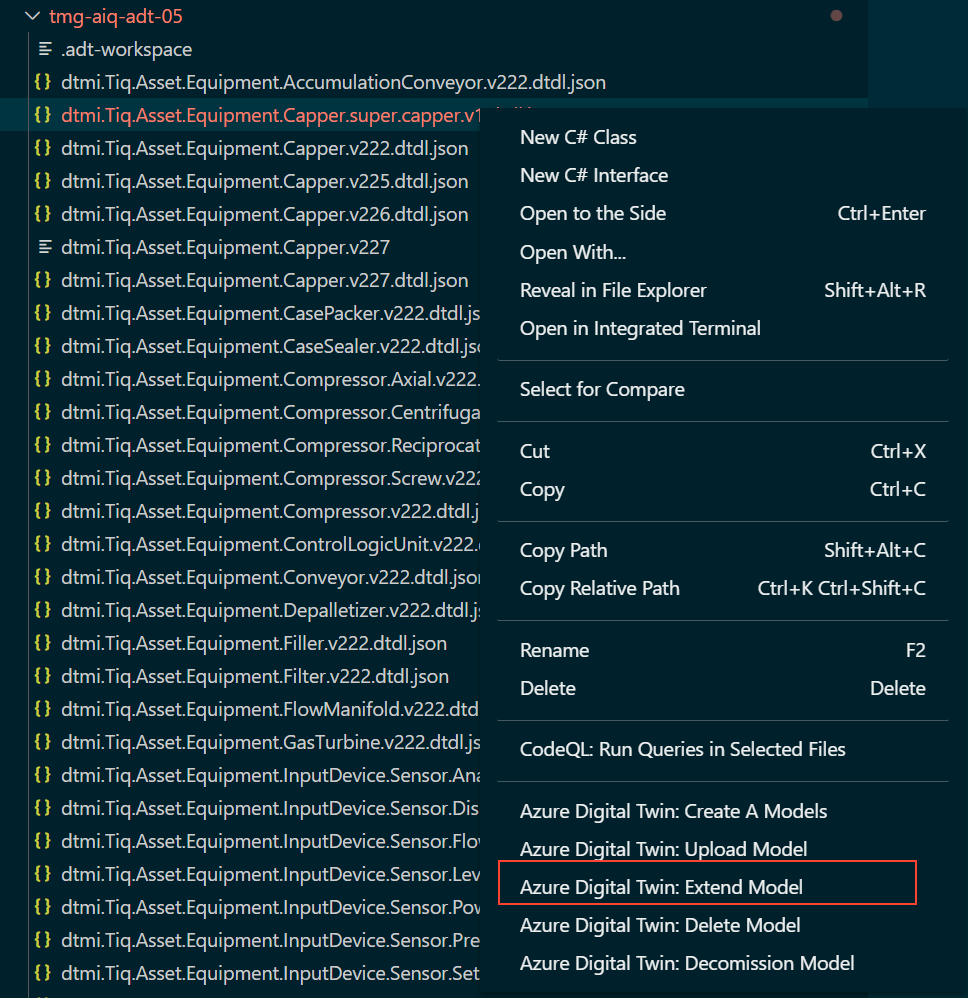
4. Extend a Model
Right clicking on a model file (.json or .dtdl) and selecting “Extend Model” will provide the user with a set of prompts for a new model name and an id. It will then create the new model file and open it ready for editing.
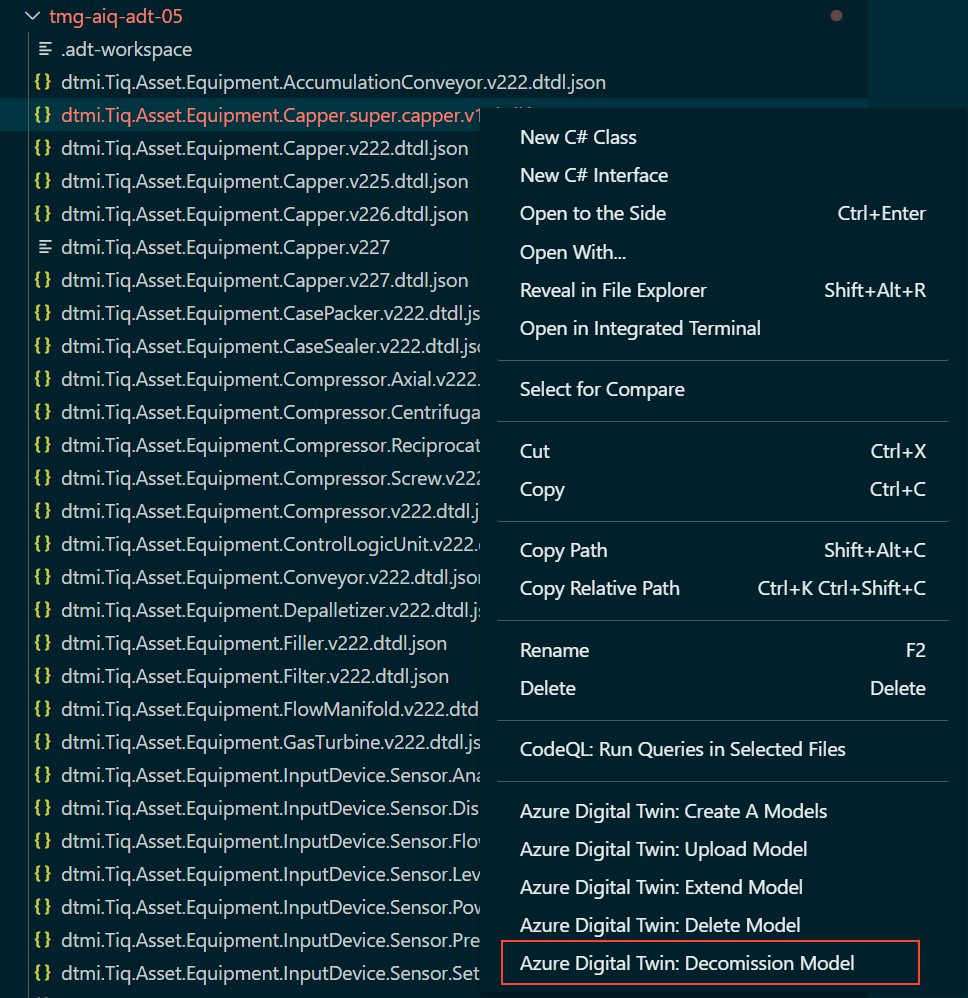
5. Decommission A Model
In the explorer panel on the left, right click on a model file (either a .json or a .dtdl file) and select “Decommission Model” this will decommission the selected model within the Twin Instance.
Recreating and refactoring weareninja.com’s “space warp” effect
In 2021, I created this space warp effect in 3D using react-three-fiber, a React-based renderer for three.js. The effect looked like this:
The result looks cool and all, but there were a number of problems with my implementation of this effect:
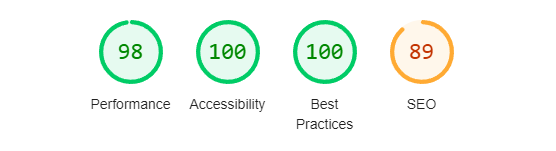
It was not performant on certain platforms, mobile devices espcecially. If I recall correctly, Google’s Lighthouse reported a disappointing score of ~65% for performance. Not good.
Some of the postprocessing effects (bloom, chromatic aberration) were poorly chained together, resulting in a noticeable pop-in when the space warp ended
It uses React’s setState() in the animation loop, which is a big no-no
My goal in this project is to recreate the “space warp” effect, fix my previous errors and improve both performance and code-readability in my implementation. I will also outline all of the main steps in creating this effect, with diagrams that illustrate these steps. Some basic knowledge of high-scool level mathematics is not required but recommended.
Constructing a basic scene in r3f is simple enough. We can use a <Canvas /> element to initialise the canvas and construct the scene. Then, we can put whatever we want in the <Canvas /> to render 3D objects in the scene.
Then we want to create a bunch of boxes randomly scattered on the x and y axis within this scene, as a starting point for the space warp effect. There are several ways of doing this in three.js:
Creating a mesh for each object, and rendering them all ⇒ Not performant, a draw call occurs for each and every object ❌
Initialising a buffer geometry, and assigning it a PointsMaterial, making each vertex of the geometry a particle ⇒ Very performant, but we cannot apply scale transformations on each particle. This is because each particle is essentially a 2D sprite ❌
Using a single InstancedMesh works best, since we can render a large number of objects using one draw call. It also supports positional, rotational and scaling transformations on each object ✅
Being able to transform each object individually is important for the warp effect, explained later on.
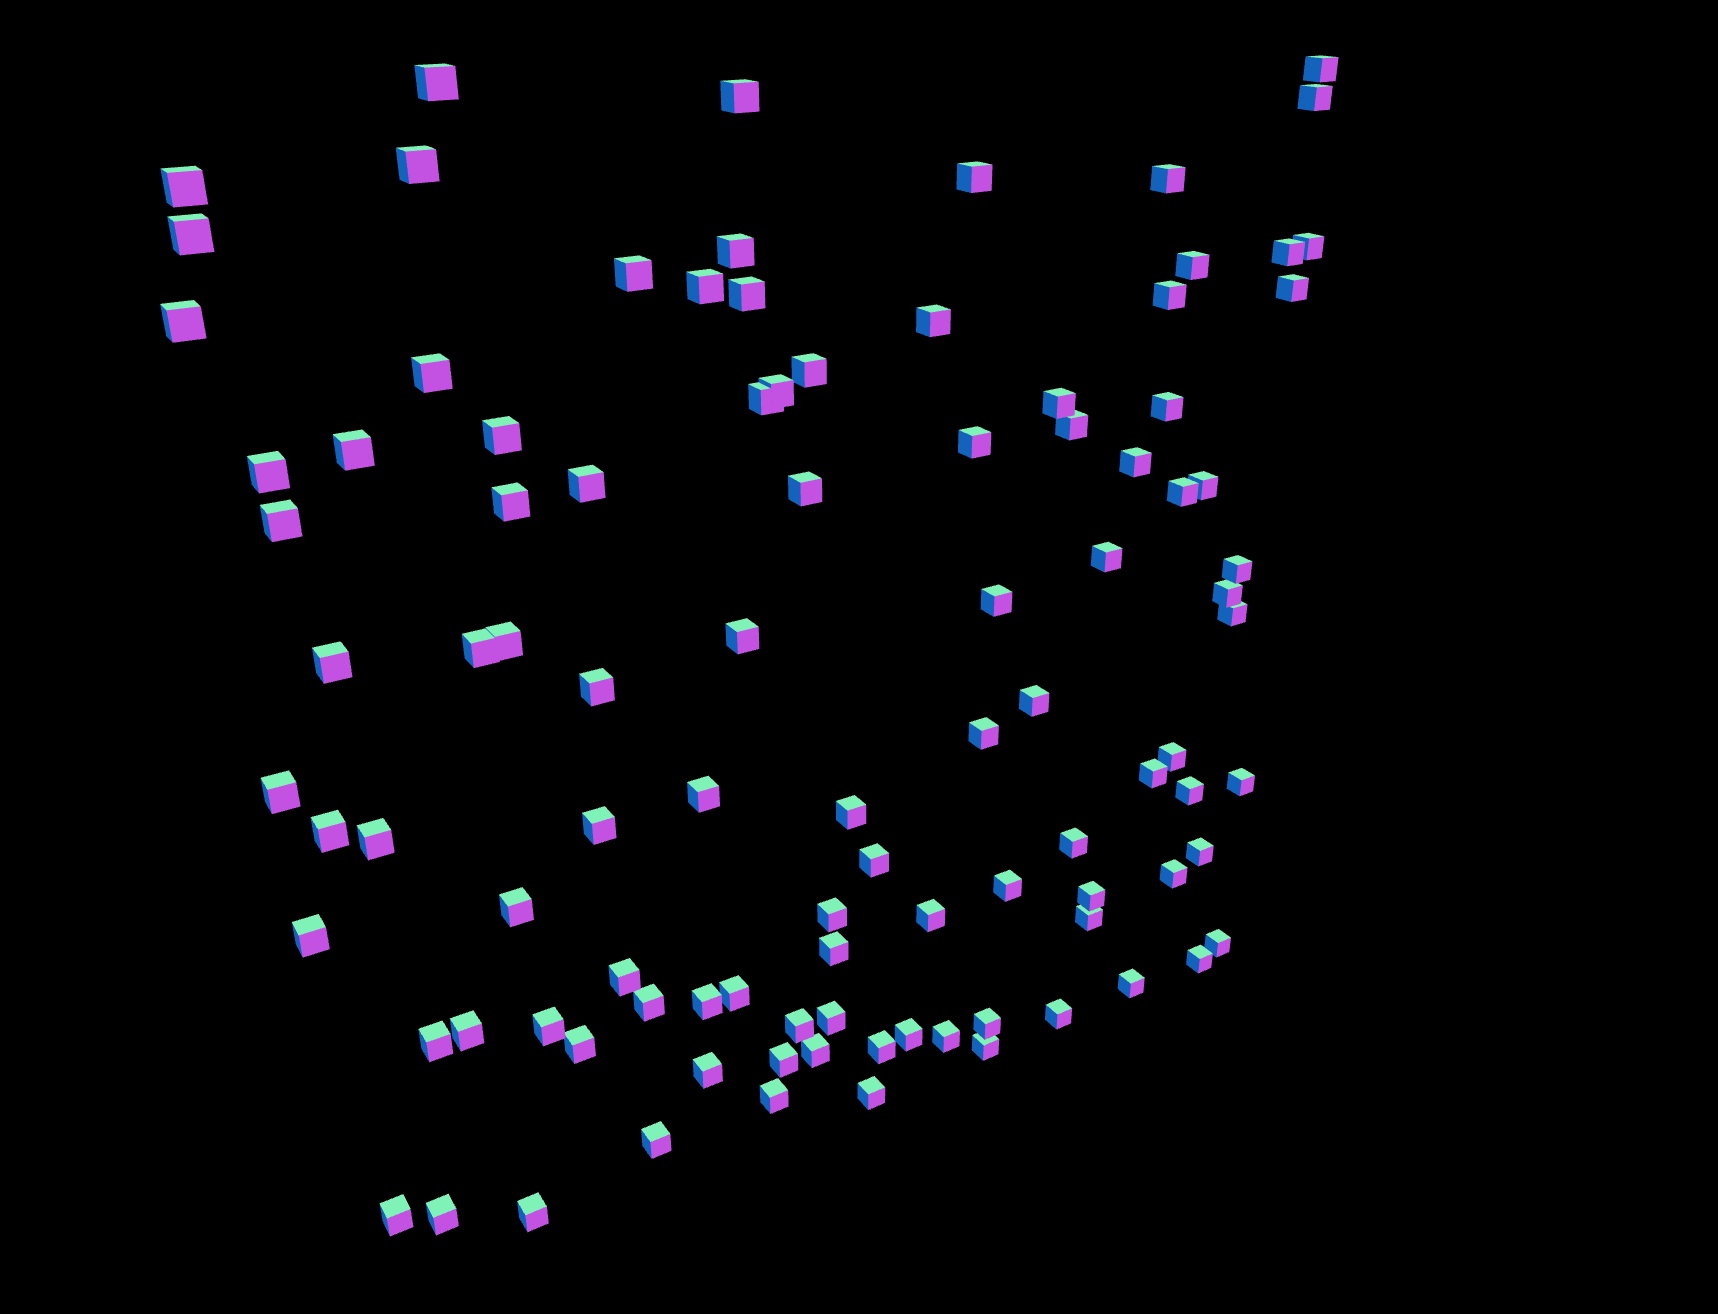
// Scene.tsximport{useEffect,useRef}from"react";import*asTHREEfrom"three";exportinterfaceSceneProps{}constCOUNT=100;exportconstScene=({}: SceneProps)=>{constref=useRef<THREE.InstancedMesh>();useEffect(()=>{if(!ref.current)return;// Set positionsconsttemp=newTHREE.Object3D();for(leti=0;i<COUNT;i++){temp.position.set(generatePos(),generatePos(),0);temp.updateMatrix();ref.current.setMatrixAt(i,temp.matrix);}// Update the instanceref.current.instanceMatrix.needsUpdate=true;},[]);return(<instancedMeshref={refasany}args={[undefined,undefined,COUNT]}><boxGeometryargs={[0.2,0.2,0.2]}/><meshNormalMaterial/></instancedMesh>);};functiongeneratePos(){return(Math.random()-0.5)*10;}
After doing all this, we get something like this showing up on the screen. These colourful looking boxes will become spherical stars very soon.
Animating each object
In order to animate our instanced objects, we need to modify their positions individually, which is stored within the instanced mesh’s matrix data. First, lets change how each object’s position is initialised.
// Scene.tsx
export const Scene = ({}: SceneProps) => {
...
- useEffect(() => {- if (!ref.current) return;-- // Set positions- const temp = new THREE.Object3D();- for (let i = 0; i < COUNT; i++) {- temp.position.set(generatePos(), generatePos(), 0);- temp.updateMatrix();- ref.current.setMatrixAt(i, temp.matrix);- }-- // Update the instance- ref.current.instanceMatrix.needsUpdate = true;- }, []);+ useEffect(() => {+ if (!ref.current) return;++ const t = new Object3D();+ let j = 0;+ for (let i = 0; i < COUNT * 3; i += 3) {+ t.position.x = generatePos();+ t.position.y = generatePos();+ t.position.z = (Math.random() - 0.5) * 10;+ t.updateMatrix();+ ref.current.setMatrixAt(j++, t.matrix);+ }+ }, []);
...
The objects are now ready to be animated using r3f’s useFrame() hook. It is important to use either the current elapsed time or delta value to animate objects, in order to decouple the animation from the framerate.
Before we continue, lets change our boxes to spheres and increase the z-plane bounds to better represent a field of stars.
// Scene.tsx
export const Scene = ({}: SceneProps) => {
...
const temp = new THREE.Matrix4();
const tempPos = new Vector3();
useFrame((state, delta) => {
if (!ref.current) return;
for (let i = 0; i < COUNT; i++) {
ref.current.getMatrixAt(i, temp);
tempPos.setFromMatrixPosition(temp);
- if (tempPos.z > 5) {+ if (tempPos.z > 10) {- tempPos.z = -5;+ tempPos.z = -10;
} else {
tempPos.z += delta;
}
temp.setPosition(tempPos);
ref.current.setMatrixAt(i, temp);
}
ref.current.instanceMatrix.needsUpdate = true;
});
return (
<instancedMesh
ref={ref as any}
args={[undefined, undefined, COUNT]}
matrixAutoUpdate
>
- <boxGeometry args={[0.1, 0.1, 0.1]} />+ <sphereGeometry args={[0.05]} />
<meshNormalMaterial />
</instancedMesh>
);
}
The space warp animation can be broken down into 2 distinct phases:
The stars move at maximum warp speed, resulting in them being stretched out due to time dilation and other physics-based phenomena
Then, they slow down and return to their original spherical shape
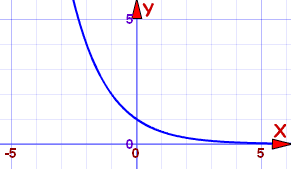
When an object “slows down”, we call this deceleration. We can mimic this deceleration mathematically by using a decreasing exponential function, otherwise known as exponential decay.
[]
The graph above is defined by the function:
$$f(x) = (0.5)^x$$
As $\ x$ grows bigger, the output tends towards 0. When $\ x$ decreases, the output tends to infinity. This function works great for animating the velocity of the stars.
An important thing to consider when using exponential decay is that the output will never be 0, even if x is infinitesimally small. So we wrap the function call in a Math.max() in order to define a minimum value above 0.
And here is the result. Note how the stars decelerate to a minimum velocity, and stays at that velocity.
step2.mp4
Warping the stars
Lets warp the stars. This can be achieved easily by animated each object’s scale on the z-axis. We want the stars to be incredibly stretched out when it is at peak velocity, and return back to normal once they slow down to the minimum velocity. We can reuse the function for exponential decay to animate this effect.
// Scene.tsx
const temp = new THREE.Matrix4();
const tempPos = new Vector3();
+ const tempScale = new Vector3();+ const tempObject = new Object3D();
useFrame((state, delta) => {
if (!ref.current) return;
for (let i = 0; i < COUNT; i++) {
ref.current.getMatrixAt(i, temp);
+ // update scale+ tempObject.scale.set(+ 1,+ 1,+ Math.max(1, Math.pow(0.5, state.clock.elapsedTime) * 10)+ );
// update position
tempPos.setFromMatrixPosition(temp);
if (tempPos.z > 10) {
tempPos.z = -10;
} else {
tempPos.z += Math.max(delta, Math.pow(0.5, state.clock.elapsedTime));
}
- temp.setPosition(tempPos);+ tempObject.position.set(tempPos.x, tempPos.y, tempPos.z);+ tempObject.updateMatrix();- ref.current.setMatrixAt(i, temp);+ ref.current.setMatrixAt(i, tempObject.matrix);
}
ref.current.instanceMatrix.needsUpdate = true;
});
By stretching the stars out to a comical degree, we can create the illusion that they are travelling incredibly fast.
step3_1.mp4
Fading stars out
Right now our stars are popping out of view when it reaches the end of the z bound. This can be fixed by “fading” each star out as they travel further away from the camera. I can think of 2 ways of achieving this effect:
Then, we can modify each star’s RGB values based on their z position. As their z position approaches the end of the z bound, we reduce the RGB values to 0.
Now the stars fade to black as they move away from the camera.
step4.mp4
Sideview:
step4_1.mp4
Post processing effects
It’s time to add some flare to the space warp. We’ll first have to install the postprocessing and @react-three/postprocessing npm packages. Then, we can add a <EffectComposer /> to the scene in order to chain our post processing effects.
Bloom
Let’s start by adding bloom to the scene by adding a <Bloom /> component within the <EffectComposer />. Note how we disable tone mapping on the material of the instanced mesh by passing false to the toneMapped prop. This allows us to specify an emissive colour value to the material, which is required for the bloom effect to work.
An emissive colour value in three.js is a colour value that is greater than 1.
To make objects even brighter under the bloom effect, we can set the mipmapBlur prop to true on the <Bloom /> component.
Chromatic aberration is an effect that creates a visual distortion in the red, green and blue colour values.
Let’s add this effect to the scene, when the stars are being warped in. We can use the <ChromaticAberration /> component for this. We can specify the strength of this effect by setting the offset prop, which takes a THREE.Vector2 object as a value.
Great, now it looks really cool when stars are warping in. But we should probably tone down the effect as the stars start to slow down. The best way to do this is by modifying the offset value directly in the useFrame() hook.
First, we use React’s useRef() hook to point to our <ChromaticAberration /> effect.
And now, the chromatic aberration effect will slowly fade out as the stars slow down. Perfect.
step6.mp4
How to access effect uniforms
In the previous section, we directly modified the offset uniform value in the chromatic aberration effect in order to make it disappear as the stars slowed down.
Underneath the hood, the chromatic aberration effect is actually composed of a fragment shader and vertex shader. Shaders are lightweight programs that are run on the system’s GPU. They determine how pixels are displayed on our computer screens.
Uniform values are commonly used in shaders to tweak the shader’s behaviour. It is not uncommon to modify uniform values during the runtime of the program in order to change the look of the scene/objects.
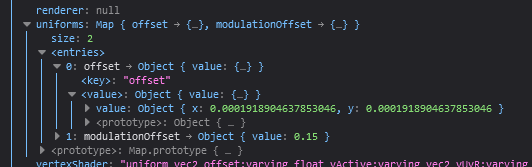
Let’s log the ref that is pointing to the <ChromaticAberration /> component to the browser console.
There are a couple of ways to find out what uniforms exist in this effect.
The first way is inspecting the uniforms property. By expanding this field in our browser devtools, we can tell that offset and modulationOffset exist as uniforms. If we expand the offset property, we can see that it contains an x and y value, indicating that it is of type Vector2
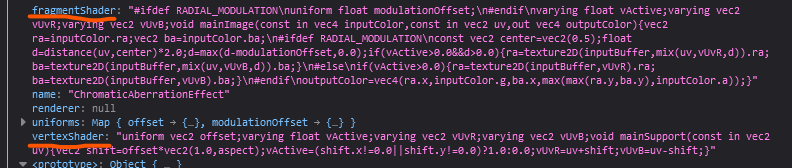
Another way is by inspecting the fragment shader and vertex shader code.
Here is the fragment shader code, formatted. We can quickly tell from the uniform float modulationOffset; statement that modulationOffset is a uniform that we can modify.
#ifdef RADIAL_MODULATION
uniformfloat modulationOffset; // <--- This is the important part#endifvaryingfloat vActive;
varyingvec2 vUvR;
varyingvec2 vUvB;
void mainImage(constinvec4 inputColor, constinvec2 uv, outvec4 outputColor) {
vec2 ra = inputColor.ra;
vec2 ba = inputColor.ba;
#ifdef RADIAL_MODULATION
constvec2 center =vec2(0.5);
float d =distance(uv, center) *2.0;
d =max(d - modulationOffset, 0.0);
if (vActive >0.0&& d >0.0) {
ra =texture2D(inputBuffer, mix(uv, vUvR, d)).ra;
ba =texture2D(inputBuffer, mix(uv, vUvB, d)).ba;
}
#elseif(vActive >0.0) {
ra =texture2D(inputBuffer, vUvR).ra;
ba =texture2D(inputBuffer, vUvB).ba;
}
#endif
outputColor =vec4(ra.x, inputColor.g, ba.x, max(max(ra.y, ba.y), inputColor.a));
}
And with the vertex shader, we can tell that offset is also a uniform that we can modify.
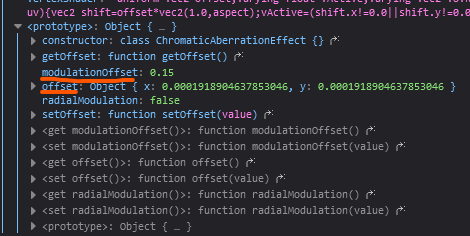
Now let’s inspect the logged object again. Notice how we can actually access and modify these uniform values directly, via the prototype fields. Very useful.
Conclusion
I had a lot of fun writing this up, and I also learnt a lot about r3f and three.js while doing so. In the end, I achieved my all of my goals for this project:
Avoided errors in previous implementation ✅
Code is performant and runs well on mobile devices ✅
Improved readability of code ✅
And if anyone else learns from this too then that’s awesome 🥳!
Laravel is a web application framework with expressive, elegant syntax. We believe development must be an enjoyable and creative experience to be truly fulfilling. Laravel takes the pain out of development by easing common tasks used in many web projects, such as:
Laravel is accessible, powerful, and provides tools required for large, robust applications.
Learning Laravel
Laravel has the most extensive and thorough documentation and video tutorial library of all modern web application frameworks, making it a breeze to get started with the framework.
You may also try the Laravel Bootcamp, where you will be guided through building a modern Laravel application from scratch.
If you don’t feel like reading, Laracasts can help. Laracasts contains over 2000 video tutorials on a range of topics including Laravel, modern PHP, unit testing, and JavaScript. Boost your skills by digging into our comprehensive video library.
Laravel Sponsors
We would like to extend our thanks to the following sponsors for funding Laravel development. If you are interested in becoming a sponsor, please visit the Laravel Partners program.
Thank you for considering contributing to the Laravel framework! The contribution guide can be found in the Laravel documentation.
Code of Conduct
In order to ensure that the Laravel community is welcoming to all, please review and abide by the Code of Conduct.
Security Vulnerabilities
If you discover a security vulnerability within Laravel, please send an e-mail to Taylor Otwell via taylor@laravel.com. All security vulnerabilities will be promptly addressed.
License
The Laravel framework is open-sourced software licensed under the MIT license.
sudo systemctl start redis # start redis
ollama run tinyllama # install model# then...
templ generate # if you've made any modifications to .templ files
go run main.go
Project Overview
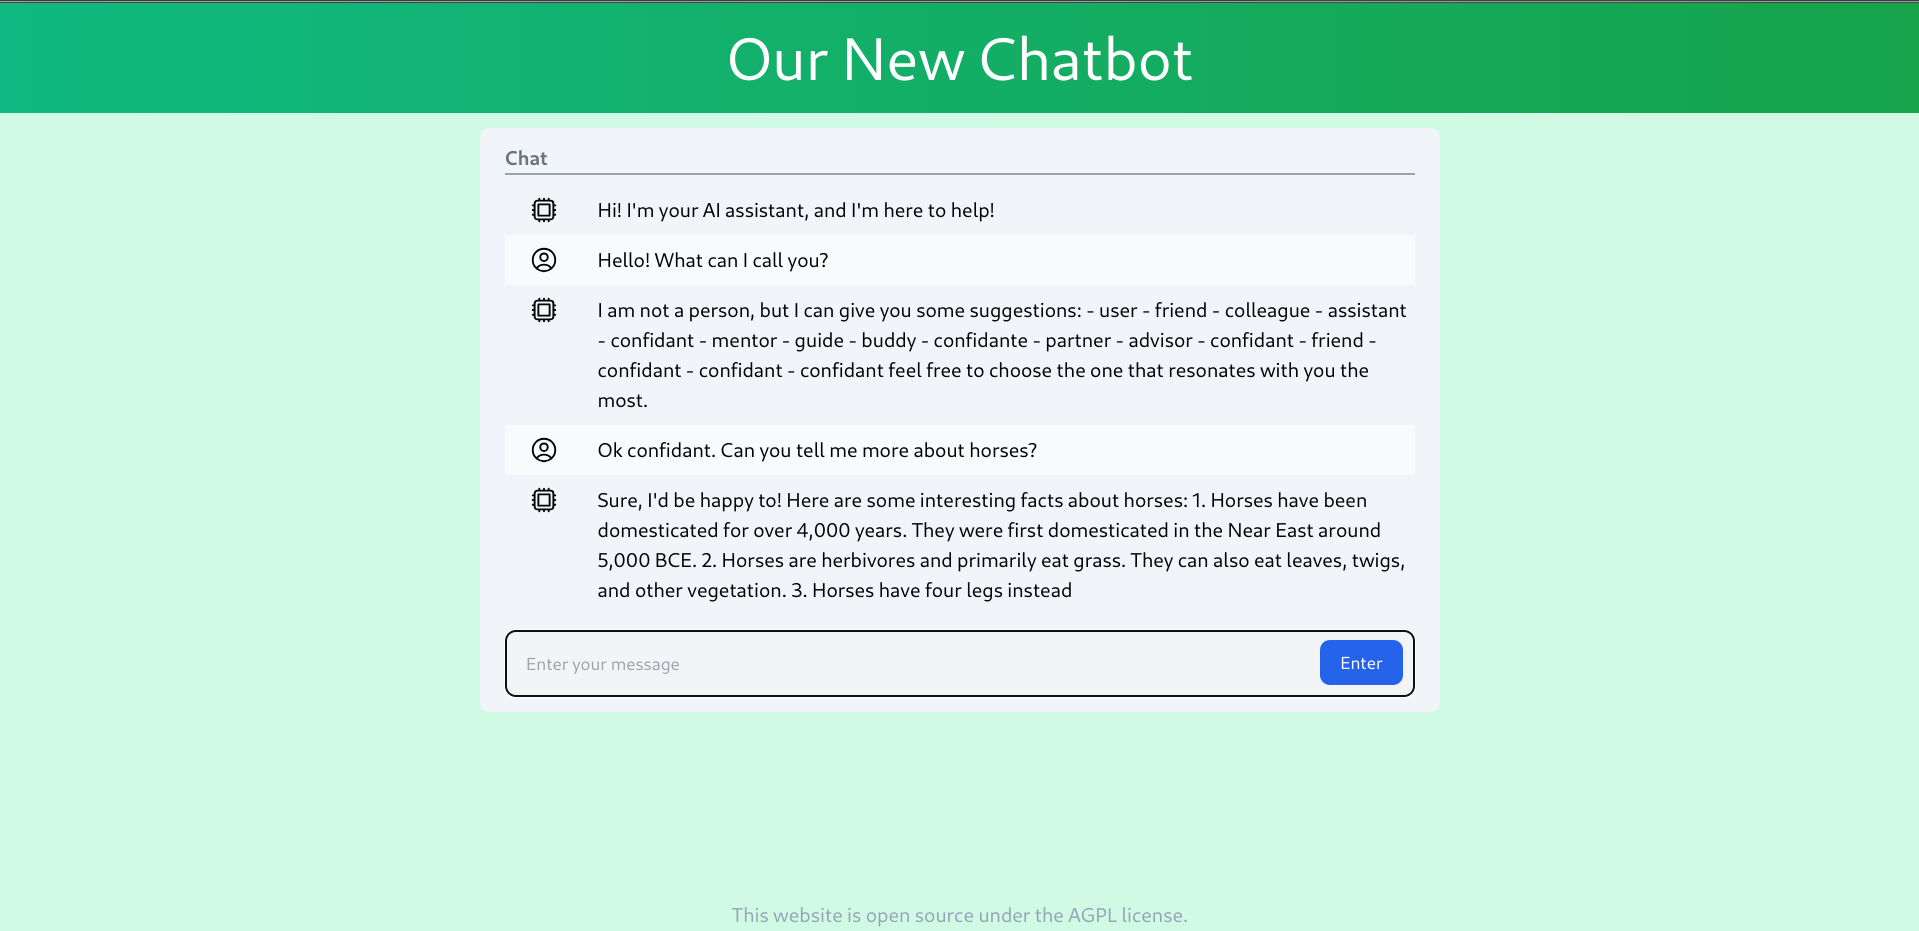
This website is meant to serve as a simple framework for challenging students to manipulate large language models into doing what they want.
Administrators can provide prompts with CTF flags and challenge students to get the flags from the model. See ./example-prompts.json for example prompts. The URL determines prompt selection with /chat/{promptName}.
Note
Usage of ./ai-hacking-lab:
    -address string
        the address to host the server on (default ":3000")
    -maxTokens int
          the maximum number of tokens in a response. (default 100)
    -modelName string
          the name of the LLM in the Ollama library (default "tinyllama")
    -modelTemperature float
          the 'temperature' of the LLM (default 0.1)
    -redisAddress string
          the address to connect to redis on; must not include protocol (default "localhost:6379")
    -ollamaAddress string
          the address to connect to ollama on; must include protocol (default "http://localhost:11434")
    -promptPath string
          the filepath to load prompts from (default "./example-prompts.json")
Powered by aiohttp, ASF_IPC is now fully asynchronous. Synchronous methods are no longer supported. ASF_IPC resolves APIs automatically from the new swagger API of ASF, so ASF_IPC always has the latest APIs data as long as ASF is updated.
importasynciofromASFimportIPCasyncdefcommand(asf, cmd):
returnawaitasf.Api.Command.post(body={
'Command': cmd
})
asyncdefmain():
# The IPC initialization duration depends on the networkasyncwithIPC(ipc='http://127.0.0.1:1242', password='YOUR IPC PASSWORD') asasf:
whileTrue:
cmd=input('Enter a command: ')
resp=awaitcommand(asf, cmd)
ifresp.success:
print(resp.result)
else:
print(f'Error: {resp.message}')
loop=asyncio.get_event_loop()
output=loop.run_until_complete(main())
loop.close()
Find the endpoint
To get a list of all endpoints of ASF, open your web browser and visit the swagger page of your ASF instance (usually http://127.0.0.1:1242/swagger).
You can see many endpoints with their paths, such as /Api/Bot/{botNames}, this endpoint in ASF_IPC is asf.Api.Bot['botNames']. Change separator to . and {} to [], you will get an endpoint object, which has request methods e.g. get(), post() etc.
Note the botNames here is not the value of the argument, to pass value, use kwargs in request methods.
After your endpoint found, you want to send some data to this endpoint, you can use get(), post(), put(), delete() methods, these methods have optional arguments:
body (dict): the JSON request body.
params (dict): the parameters in URL after a ?.
If you need to pass values to the parameters in the path, for example {botName} in /Api/Bot/{botName}/Redeem, you can pass them as kwargs of the method.
Some examples:
# POST /Api/Bot/mainaccount/Pauseawaitasf.Api.Bot['botNames'].post(botNames='mainaccount')
# GET /Api/WWW/GitHub/Releaseawaitasf.Api.WWW.GitHub.Release.get()
# POST /Api/Bot/robot with json body {'BotConfig': ...}awaitasf.Api.Bot['botName'].post(body={'BotConfig': ...}, botName='robot')
Get a response
After sending a request to the endpoint, we got a response object, which has 3 attributes:
Result or result (str): some data returned by ASF.
Message or message (str): describes what happened with the request.
Success or success (bool): if the request has succeeded.
If ASF_IPC cannot give a value to some attributes, these attributes will be None or empty value.
Formik is a small group of React components and hooks for building forms in React and React Native. It helps with the three most annoying parts: Getting values in and out of form state. Validation and error messages. Handling form submission.
Yup :
Important
Yup is a schema builder for runtime value parsing and validation. Define a schema, transform a value to match, assert the shape of an existing value, or both. Yup schema are extremely expressive and allow modeling complex, interdependent validations, or value transformation.
React Axios :
Important
Axios, which is a popular library is mainly used to send asynchronous HTTP requests to REST endpoints. This library is very useful to perform CRUD operations.
CRUD Operation methods :
Create
Read
Update
Delete
React-icons :
Important
React Icons is a powerful library that provides accessible SVG icons for React applications, integrating popular icon sets like Font Awesome, Material Design, UI design, and Ionicons into your projects seamlessly.
React-Router-Dom :
Important
Using React Router DOM is an npm package that enables you to implement dynamic routing in a web app. It allows you to display pages and allow users to navigate them. It is a fully-featured client and server-side routing library for React.
Router DOM Tags:
<BrowserRouter><Routes><Routepath="" element={TagName}/></Routes></BrowserRouter>
Pages :
Create
Home
Edit
React Hooks :
UseState
UseEffect
UseNavigate
Package Install :
npm i React-Router-DOM
npm i React-icons
npm i axios
npm i formik
npm i yup
Following requirements are completed :
Users should be able to add, edit, and delete book records. Each book record should contain the title, author, ISBN number, and publication date.
Users should be able to add, edit, and delete author records. Each author record should contain the author’s name, birth date, and a short biography.
All forms used in the dashboard should be validated using Formik.
The dashboard should have a clean and responsive design that is easy to use and navigate.
This module is distributed via npm which is bundled with node and
should be installed as one of your project’s dependencies:
npm install @remark-embedder/transformer-oembed
Usage
importremarkEmbedderfrom'@remark-embedder/core'importoembedTransformerfrom'@remark-embedder/transformer-oembed'// or, if you're using CommonJS require:// const {default: oembedTransformer} = require('@remark-embedder/transformer-oembed')importremarkfrom'remark'importhtmlfrom'remark-html'constexampleMarkdown=`# My favorite YouTube video[This](https://www.youtube.com/watch?v=dQw4w9WgXcQ) is a great YouTube video.Watch it here:https://www.youtube.com/watch?v=dQw4w9WgXcQIsn't it great!?`asyncfunctiongo(){constresult=awaitremark().use(remarkEmbedder,{transformers: [oembedTransformer],}).use(html).process(exampleMarkdown)console.log(result.toString())}go()
This will result in:
<h1>My favorite YouTube video</h1><p><ahref="https://www.youtube.com/watch?v=dQw4w9WgXcQ">This</a> is a great
YouTube video. Watch it here:
</p><iframewidth="200"
height="113"
src="https://www.youtube.com/embed/dQw4w9WgXcQ?feature=oembed"
frameborder="0"
allow="accelerometer; autoplay; clipboard-write; encrypted-media; gyroscope; picture-in-picture"
allowfullscreen></iframe><p>Isn't it great!?</p>
Config
Some oembed providers offer special configuration via query parameters. You can
provide those via config:
That results in (notice the data- attributes which are specific to twitter’s
oEmbed API):
<blockquoteclass="twitter-tweet" data-dnt="true" data-theme="dark"><plang="en" dir="ltr">
I spent a few minutes working on this, just for you all. I promise, it wont
disappoint. Though it may surprise 🎉<br/><br/>🙏
<ahref="https://t.co/wgTJYYHOzD">https://t.co/wgTJYYHOzD</a></p>
— Kent C. Dodds (@kentcdodds)
<ahref="https://twitter.com/kentcdodds/status/783161196945944580?ref_src=twsrc%5Etfw"
>October 4, 2016</a></blockquote>
This could also be used to provide an access token for providers that require
this (like Instagram).
Config as a function
You can also provide configuration as a function so you can determine what
configuration to give based on the provider and/or the URL. Like so:


_-_enlargement.jpg)


_-_enlargement.jpg)