This repository contains various audio related projects programmed in Faust.
Granola
Granola is a monophonic granular live feed processor.
The grain processor is inspired by the Mutable Instruments Beads. The grain window shape control is inspired by the GR-1 Granular synthesizer from Tasty Chips Electronics.
Specifications
Audio I/O
Manual input and output gain control.
Recording time: BUFFER_DURATION.
The FREEZE button freezes the content of the recording table.
Feedback path with attenuation and limiter (with 1 sample delay). The feedback signal comes from
the grains output (it’s before the dry/wet crossfader).
Dry/Wet control.
TODO: Stereo I/O with automatic level detection with a limiter.
TODO: Gate signal in sync with the grains.
TODO: Antialiased output.
TODO: Spatialized output.
Grains generation modes
The SEED button triggers a grain.
Automatically trigger grains at a periodic rate with the DENSITY parameter (at maximum density
there are 1000 grains generated per second (M.I. Beads has a maximum rate of ~260 grains per second).
Note: The actual number of triggered grains cannot exceed the CONCURRENT_GRAINS value (30 for M.I. Beads).
TODO: Automatically trigger grains at a randomized rate.
TODO: Start a chain of delayed and pitched grains instead of a single one.
Grain parameters
TIME: Controls the playback position of each grain within the table. In other words, it delays the grains.
SIZE: Grain duration from 0.03 seconds to the table length, forward or backward playback.
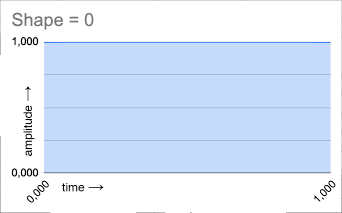
SHAPE: The shape of the grain envelope. The shape control allows to morph the shape from a square
(in this case the grain original amplitude is maintained), to an inverted saw (slow release), to a triangle
(attack and release time are the same), and finally to a saw (slow attack).
PITCH: The pitch of the grain (-2..+2 octaves).
Note: The four grain parameters are latched when a grain is triggered. Hence, the grain parameters
remain the same throughout the grain playback but they may differ for multiple grains.
TODO: TIME slew limiter for tape like scrubing effect.
// A Granola's demonstration setup with a 5 seconds buffer and an up-to-15-grains polyphony.
process = Granola(5, 15).demo;
// A Granola grain processor.
// It has a 1 second audio buffer and up to 30 grains playing a the same time.
process = Granola(1, 30).ui(0);
// Two Granola instances allowing to process each channel of a stereo signal differently.
// They have a 5 seconds audio buffer and up to 15 grains playing a the same time.
process = Granola(5, 15).ui(0), Granola(5, 15).ui(1);
// Two Granola instances sharing the same user interface making a stereo grain processor.
// They have a 5 seconds audio buffer and up to 15 grains playing a the same time.
process = Granola(5, 15).ui(0), Granola(5, 15).ui(0);
// As the Granola grain processor is able to play many copies of the input signal simultaneously,
// it may rapidly saturate its output. This could be avoided by manualy reducing the output gain,
// by selecting a smoother grain-window shape and/or by placing a limiter in the circuit path.
// Also note that Granola pairs well with a reverb.
process = Granola(2, 30).ui(0) : co.limiter_1176_R4_mono <: dm.zita_light;
// Granola used as a delay like effect. Parameters are taylored for the default audio file
// of the Faust web IDE (wait 5 seconds to let the table be filled). Play it looped.
process = Granola(5, 10).grains(0, _, 4.76, 0, 0.5, 0, 0.5, 0.5, 0.03, 0.5, 1, 0, 0, 0.5);
// Granola used as a complex feedback effect: the most important parameter here is the 6th,
// the feedback control. Feed the input with some audio (the looped  default audio file, for
// example). Let the feedback grow. It will gradually decrease when the sound is muted.
//
// __Be careful with your ears, this can get very loud.__
//
process = Granola(5, 10).grains(0, _, 4.72, 0, 1, 0.4, 1, 0.6, 0.604, 3, 0.972, 0, 0, 0.5);
This is an application that uses statistical data collected over time to predict outcomes in Texas Hold’em matches. It provides a CLI interface that prompts the user to fill the card in his/her hand and table for each round, and whenever the user won or lost each match. This information is stored and queried using Eresye, a rule-based knowledge management engine, and the probabilities of occurrence for each card per round, along with the probability of winning or losing the match with the current cards, are recalculated at the end of every match and organized into a decision tree. At each round, the probability of getting a good hand and win the match is read from the Decision tree and printed to the user, suggesting him to either raise, call or fold.
The entire application and the state-less decision tree classifier are fully implemented in Erlang, in the file ‘poker.erl’. A trained model containing the history of matches and ranked hands is also provided (‘storage’ file), so you can start testing the application immediately.
This library uses and abuses the features of C# to provide a pure functional-programming framework that, if you squint, can look like
extensions to the language itself. The desire here is to make programming in C# much more robust by helping the engineer’s inertia flow
in the direction of declarative and pure functional code rather than imperative. Using these techniques for large code-bases can bring
tangible benefits to long-term maintenance by removing hidden complexity and by easing the engineer’s and team’s cognitive load.
F# to C# interop package. Provides interop between the LanguageExt.Core types (like Option, List and Map) to the F# equivalents, as well as interop between core BCL types and F#
Provides an effects wrapper around the .NET System namespace making common IO operations pure and unit-testable
Getting started
To use this library, simply include LanguageExt.Core.dll in your project or grab it from NuGet. It is also worth setting up some global using for your project. This is the full list that will cover the key functionality and bring it into scope:
The namespace LanguageExt contains most of the core types; LanguageExt.Prelude contains the functions that bring into scope the prelude functions that behave like standalone functions in ML style functional programming languages; LanguageExt.Traits brings in the higher-kinded trait-types and many extensions; LanguageExt.Common brings in the Error type and predefined Errors.
Prologue
From C# 6 onwards we got the ability to treat static classes like namespaces. This means that we can use static
methods without qualifying them first. That instantly gives us access to single term method names that look exactly like functions
in ML-style functional languages. i.e.
This library tries to bring some of the functional world into C#. It won’t always sit well with the seasoned C# OO programmer,
especially the choice of camelCase names for a lot of functions and the seeming ‘globalness’ of a lot of the library.
I can understand that much of this library is non-idiomatic, but when you think of the journey C# has been on, is “idiomatic”
necessarily right? A lot of C#’s idioms are inherited from Java and C# 1.0. Since then we’ve had generics, closures, Func, LINQ,
async… C# as a language is becoming more and more like a functional language on every release. In fact, the bulk of the new
features are either inspired by or directly taken from features in functional languages. So perhaps it’s time to move the C#
idioms closer to the functional world’s idioms?
My goal with this library is very much to create a whole new community within the larger C# community. This community is not
constrained by the dogma of the past or by the norms of C#. It understands that the OOP approach to programming has some problems
and tries to address them head-on.
And for those that say “just use F#” or “just use Haskell”, sure, go do that. But it’s important to remember that C# has a lot
going for it:
Incredible investment into a state-of-the art compiler
Incredible tooling (Visual Studio and Rider)
A large ecosystem of open-source libraries
A large community of developers already using it
This is also very important for companies that hire engineers
It is a functional programming language! It has first-class functions, lambdas, etc.
And with this library it has a functional-first Base Class Library
A note about naming
One of the areas that’s likely to get seasoned C# heads worked up is my choice of naming style. The intent is to try and make
something that feels like a functional language rather than following rules of naming conventions (mostly set out by
the BCL).
There is, however, a naming guide that will keep you in good stead while reading through this documentation:
Type names are PascalCase in the normal way
The types all have constructor functions rather than public constructors that you instantiate with new. They will always
be PascalCase:
Any (non-type constructor) static function that can be used on its own by using static LanguageExt.Prelude are camelCase.
varx=map(opt, v =>v*2);
Any extension methods, or anything “fluent” are PascalCase in the normal way
varx=opt.Map(v =>v*2);
Even if you disagree with this non-idiomatic approach, all of the camelCase static functions have fluent variants, so you never actually have to see the non-standard stuff.
Uses patch-theory to efficiently calculate the difference (Patch.diff(list1, list2)) between two collections of A and build a patch which can be applied (Patch.apply(patch, list)) to one to make the other (think git diff).
The traits are major feature of v5+ language-ext that makes generic programming with higher-kinds a reality. Check out Paul’s series on Higher Kinds to get a deeper insight.
These work a little like type-aliasing but they impart semantic meaning and some common operators for the underlying value.
Location
Feature
Description
Core
DomainType<SELF, REPR>
Provides a mapping from SELF to an underlying representation: REPR
Core
Identifier <SELF>
Identifiers (like IDs in databases: PersonId for example), they are equivalent to DomaintType with equality.
Core
VectorSpace<SELF, SCALAR>
Scalable values; can add and subtract self, but can only multiply and divide by a scalar. Can also negate.
Core
Amount <SELF, SCALAR>
Quantities, such as the amount of money in USD on a bank account or a file size in bytes. Derives VectorSpace, IdentifierLike, DomainType, and is orderable (comparable).
Core
Locus <SELF, DISTANCE, SCALAR>
Works with space-like structures. Spaces have absolute and relative distances. Has an origin/zero point and derives DomainType, IdentifierLike, AmountLike and VectorSpace. DISTANCE must also be an AmountLike<SELF, REPR, SCALAR>.
These features are still a little in-flux as of 17th Oct 2024 – they may evolve, be renamed, or removed – but I like the idea!
---
# defaults file for functionsfunctions_strings:
- "A regular line."
- "CAPITALS ONLY"
- "lowercase only"
- " Extra spaces. "
- "A line with the word new and old."
- "A line with integers. 1, 2 & 3."functions_integers:
- 0
- 1
- 1.4
- 1.5
- 1.6
- 2.0
This library is currently under active development. Check out the current status for a list of implemented commands.
Consider contributing if you need a specific command:
Check src/api/index.ts for current implementation
Add your needed command following the same pattern
Open a Pull Request
✨ Features
🔒 Fully Type-Safe: End-to-end type safety for all API calls, including async operations
📄 OpenAPI Support: Generated spec for integration with any language/client
🧩 Framework Agnostic: Works with any fetch client
🚀 Async Operations: First-class support for Rclone’s async operations
✅ Runtime Validation: Uses Zod to validate types at runtime
💪 HTTP Status Handling: Error responses handled through typed status codes
Installation
# Using npm
npm install rclone-rc

# Using yarn
yarn add rclone-rc

# Using pnpm
pnpm add rclone-rc
Usage
Basic Client
import{createClient}from'rclone-rc';constapi=createClient({baseUrl: 'http://localhost:5572',username: 'your-username',// Optional if running with --rc-no-authpassword: 'your-password',// Optional if running with --rc-no-auth});try{// Get rclone version with typed responseconst{ status, body }=awaitapi.version();if(status===200){console.log('Rclone version:',body.version);// typed}elseif(status===500){console.log('Error:',body.error);// also typed}// List files with type-safe parameters and responseconstfiles=awaitapi.list({body: {fs: 'remote:path',remote: ''}});if(files.status===200){console.log('Files:',files.body.list);}}catch(error){// Only network errors will throw exceptionsconsole.error('Network error:',error);}
Error Handling
This library handles errors in two ways:
HTTP Status Errors: Returned as typed responses with appropriate status codes
Network Errors: Thrown as exceptions when server is unreachable
Async Operations
For long-running operations:
import{createClient,createAsyncClient}from'rclone-rc';constapi=createClient({baseUrl: 'http://localhost:5572'});constasyncApi=createAsyncClient({baseUrl: 'http://localhost:5572'});try{// Start async jobconstjob=awaitasyncApi.list({body: {fs: 'remote:path',remote: '',_async: true,// You need to pass this flag to the async client}});// Access job ID and check statusconstjobId=job.body.jobid;// Check job status using the non-async clientconststatus=awaitapi.jobStatus({body: {jobid: jobId}});if(status.status===200&&status.body.finished){console.log('Job output:',status.body.output);}}catch(error){console.error('Network error:',error);}
Runtime Type Validation
Zod validates both request and response types at runtime:
Request validation: Parameters, body, and query are validated before sending
Response validation: Can be disabled with validateResponse: false in client options
constapi=createClient({baseUrl: 'http://localhost:5572',validateResponse: false,// true by default});
OpenAPI Integration
Generate an OpenAPI specification for use with other languages and tools:
az ad app create –reply-urls https://$SERVER_APP_NAME –display-name $SERVER_APP_NAME –password $SERVER_APP_PASSWORD
SERVER_APP_ID=$(az ad app list –output json | jq -r –arg appname $SERVER_APP_NAME ‘.[]| select(.displayName==$appname) |.appId’)
az ad app update –id $SERVER_APP_ID –set groupMembershipClaims=All
az ad app permission add –id $SERVER_APP_ID –api $MICROSOFT_GRAPH_GUID –api-permissions $USER_READ_ALL_DELEGATED=$AAD_SCOPE $DIRECTORY_READ_ALL_DELEGATED=$AAD_SCOPE $DIRECTORY_READ_ALL_APPLICATION=$AAD_ROLE
az ad app permission admin-consent –id $SERVER_APP_ID
#Client Application
CLIENT_APP_ID=$(az ad app create –display-name “${SERVER_APP_NAME}-Client” –native-app –reply-urls “https://${SERVER_APP_NAME}-Client” –query appId -o tsv)
SERVER_OAUTH_PERMISSION_ID=$(az ad app show –id $SERVER_APP_ID –query “oauth2Permissions[0].id” -o tsv)
az ad app permission add –id $CLIENT_APP_ID –api $SERVER_APP_ID –api-permissions $SERVER_OAUTH_PERMISSION_ID=Scope
#az ad app permission grant –id $CLIENT_APP_ID –api $SERVER_APP_ID
az ad app permission admin-consent –id $CLIENT_APP_ID
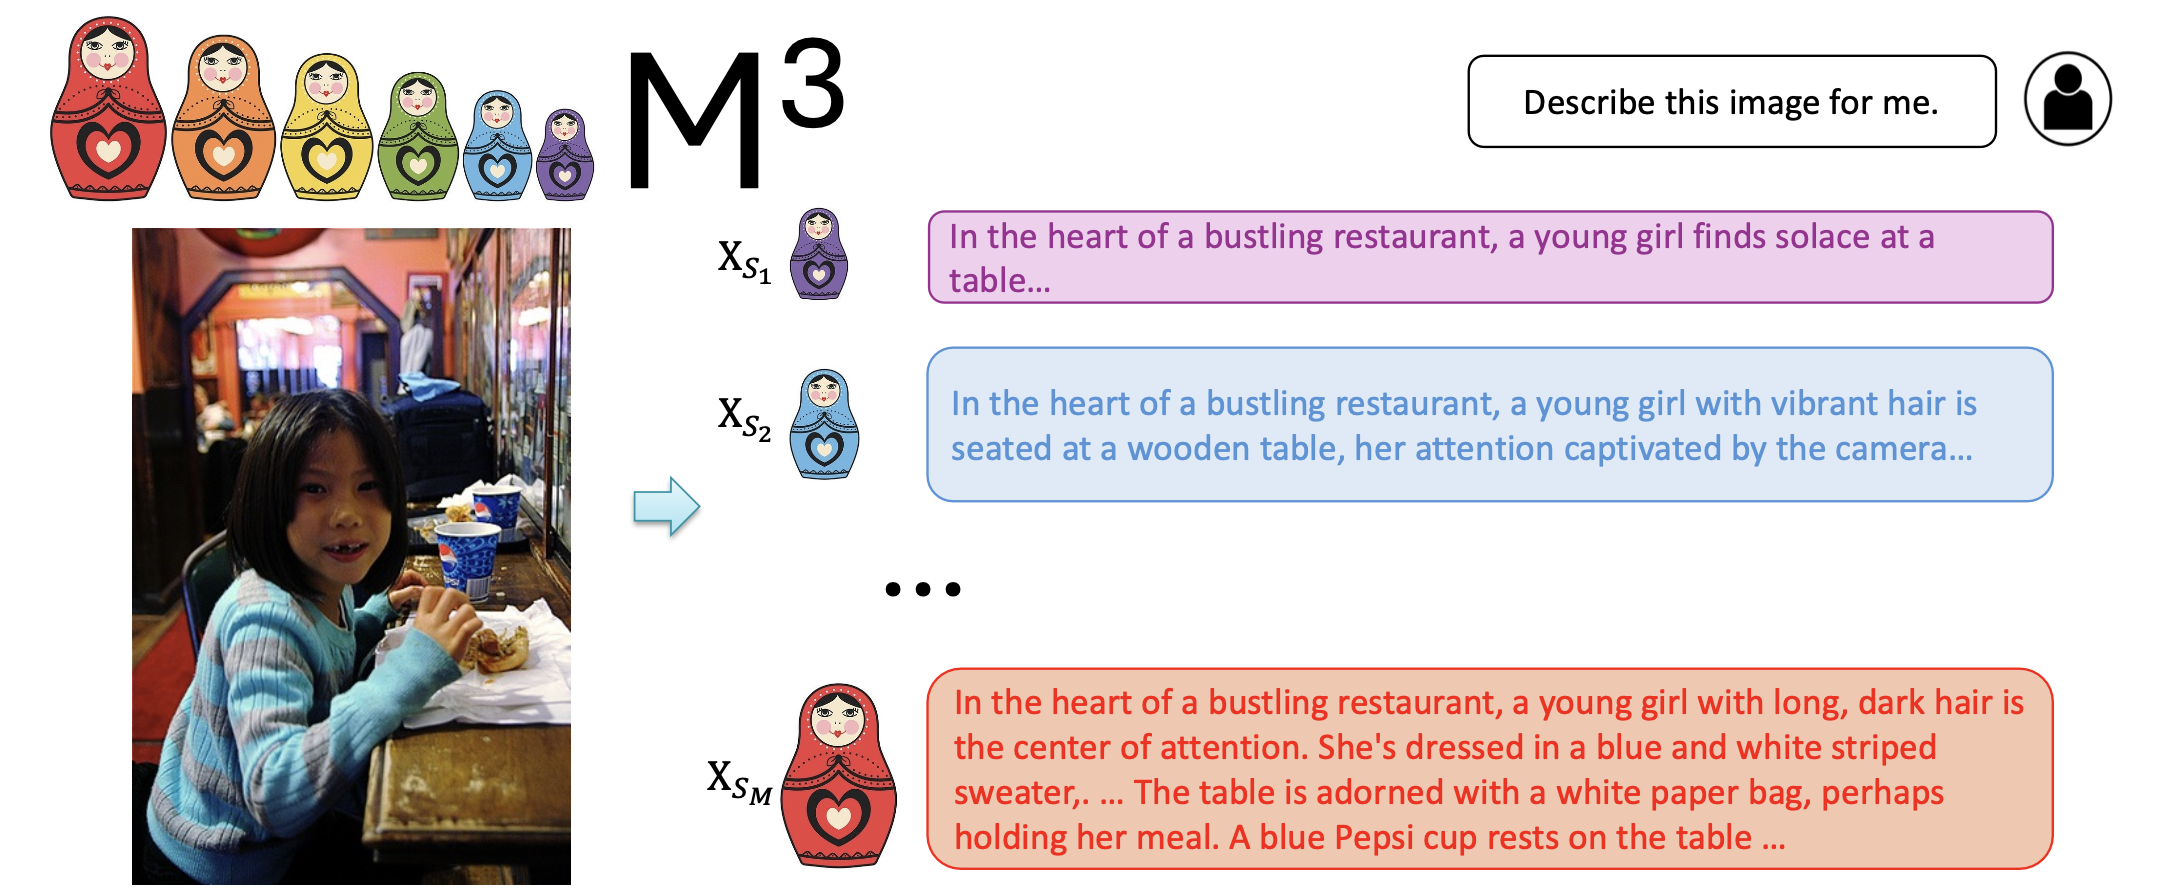
[6/3] 🔥 All training (llava-1.5-m3) and evaluations (llava-1.5-m3 and llava-next-m3) code are release.
[5/27] 🔥 We released Matryoshka Multimodal Models. We propose to learn visual tokens in a nested manner following a coarse-to-fine order. Checkout the paper and demo.
The fundamental implementation of M3 can be found in this code snippet.
Usage and License Notices: This project utilizes certain datasets and checkpoints that are subject to their respective original licenses. Users must comply with all terms and conditions of these original licenses, including but not limited to the OpenAI Terms of Use for the dataset and the specific licenses for base language models for checkpoints trained using the dataset (e.g. Llama community license for LLaMA-2 and Vicuna-v1.5). This project does not impose any additional constraints beyond those stipulated in the original licenses. Furthermore, users are reminded to ensure that their use of the dataset and checkpoints is in compliance with all applicable laws and regulations.
Check out the details wth the load_pretrained_model function in llava/model/builder.py.
You can also use the eval_model function in llava/eval/run_llava.py to get the output easily. By doing so, you can use this code on Colab directly after downloading this repository.
model_path="mucai/llava-next-vicuna-7b-m3"prompt="What are the things I should be cautious about when I visit here?"image_file="https://llava-vl.github.io/static/images/view.jpg"args=type('Args', (), {
"model_path": model_path,
"model_base": None,
"model_name": get_model_name_from_path(model_path),
"query": prompt,
"conv_mode": None,
"image_file": image_file,
"sep": ",",
"temperature": 0,
"top_p": None,
"num_beams": 1,
"max_new_tokens": 512,
"matryoshka_vis_token_scale": 576,
})()
eval_model(args)
M3 Weights
Please check out our Model Zoo for all public M3 checkpoints, and the instructions of how to use the weights.
Demo
Gradio Web UI
To launch a Gradio demo locally, please run the following commands one by one. If you plan to launch multiple model workers to compare between different checkpoints, you only need to launch the controller and the web server ONCE.
flowchart BT
    %% Declare Nodes
    gws("Gradio (UI Server)")
    c("Controller (API Server):<br/>PORT: 10000")
    mw7b("Model Worker:<br/>llava-next-vicuna-7b-m3<br/>PORT: 40000")
    mw13b("Model Worker:<br/>llava-next-vicuna-7b-m3<br/>PORT: 40001")
    sglw13b("Backend:<br/>llava-v1.5-7b-m3<br/>http://localhost:30000")
    lsglw13b("Worker:<br/>lllava-v1.5-7b-m3<<br/>PORT: 40002")

    %% Declare Styles
    classDef data fill:#3af,stroke:#48a,stroke-width:2px,color:#444
    classDef success fill:#8f8,stroke:#0a0,stroke-width:2px,color:#444
    classDef failure fill:#f88,stroke:#f00,stroke-width:2px,color:#444

    %% Assign Styles
    class id,od data;
    class cimg,cs_s,scsim_s success;
    class ncimg,cs_f,scsim_f failure;

    subgraph Demo Connections
        direction BT
        c<-->gws

        mw7b<-->c
        mw13b<-->c
        lsglw13b<-->c
        sglw13b<-->lsglw13b
    end
You just launched the Gradio web interface. Now, you can open the web interface with the URL printed on the screen. You may notice that there is no model in the model list. Do not worry, as we have not launched any model worker yet. It will be automatically updated when you launch a model worker.
Launch a model worker
This is the actual worker that performs the inference on the GPU. Each worker is responsible for a single model specified in --model-path.
Wait until the process finishes loading the model and you see “Uvicorn running on …”. Now, refresh your Gradio web UI, and you will see the model you just launched in the model list.
You can launch as many workers as you want, and compare between different model checkpoints in the same Gradio interface. Please keep the --controller the same, and modify the --port and --worker to a different port number for each worker.
python -m llava.serve.model_worker --host 0.0.0.0 --controller http://localhost:30000 --port <different from 40000, say 40001> --worker http://localhost:<change accordingly, i.e. 40001> --model-path <ckpt2>
If you are using an Apple device with an M1 or M2 chip, you can specify the mps device by using the --device flag: --device mps.
Launch a model worker (Multiple GPUs, when GPU VRAM <= 24GB)
If the VRAM of your GPU is less than 24GB (e.g., RTX 3090, RTX 4090, etc.), you may try running it with multiple GPUs. Our latest code base will automatically try to use multiple GPUs if you have more than one GPU. You can specify which GPUs to use with CUDA_VISIBLE_DEVICES. Below is an example of running with the first two GPUs.
Launch a model worker (4-bit, 8-bit inference, quantized)
You can launch the model worker with quantized bits (4-bit, 8-bit), which allows you to run the inference with reduced GPU memory footprint, potentially allowing you to run on a GPU with as few as 12GB VRAM. Note that inference with quantized bits may not be as accurate as the full-precision model. Simply append --load-4bit or --load-8bit to the model worker command that you are executing. Below is an example of running with 4-bit quantization.
You can train and launch the model worker with LoRA weights using our instructions here..
CLI Inference
Chat about images using LLaVA without the need of Gradio interface. It also supports multiple GPUs, 4-bit and 8-bit quantized inference. With 4-bit quantization, for our LLaVA-1.5-7B, it uses less than 8GB VRAM on a single GPU.
M3 finetunes LLaVA checkpoints using the exact same visual instruction data.
LLaVA is trained on 8 H100 GPUs with 80GB memory. To train on fewer GPUs, you can reduce the per_device_train_batch_size and increase the gradient_accumulation_steps accordingly. Always keep the global batch size the same: per_device_train_batch_size x gradient_accumulation_steps x num_gpus.
Hyperparameters
We use the exact same hyperparameters as LLaVA in finetuning. Hyperparameters used are provided below.
Hyperparameter
Global Batch Size
Learning rate
Epochs
Max length
Weight decay
LLaVA-v1.5-7B-M3
128
2e-5
1
2048
0
Download Vicuna checkpoints (automatically)
Our base model Vicuna v1.5, which is an instruction-tuned chatbot, will be downloaded automatically when you run our provided training scripts. No action is needed.
M3 Visual Instruction Tuning
Prepare data
Please download the annotation of the final mixture our instruction tuning data llava_v1_5_mix665k.json, and download the images from constituting datasets:
You may download our pretrained projectors in Model Zoo. It is not recommended to use legacy projectors, as they may be trained with a different version of the codebase, and if any option is off, the model will not function/train as we expected.
Training script with DeepSpeed ZeRO-3: finetune.sh.
If you are do not have enough GPU memory:
Use LoRA: finetune_lora.sh. We are able to fit 13B training in 8-A100-40G/8-A6000, and 7B training in 8-RTX3090. Make sure per_device_train_batch_size*gradient_accumulation_steps is the same as the provided script for best reproducibility.
Replace zero3.json with zero3_offload.json which offloads some parameters to CPU RAM. This slows down the training speed.
If you are interested in finetuning M3 model to your own task/data, please check out Finetune_Custom_Data.md。
Evaluation
We use the same benchmark as LLaVA-1.5 and LLaVA-Next
For LLaVA-NeXT on image understanding, see lmms-eval.
For LLaVA-NeXT on video understanding, see IG-VLM.
Citation
If you find LLaVA useful for your research and applications, please cite using this BibTeX:
@article{cai2024matryoshka,
  title={Matryoshka Multimodal Models},
  author={Cai, Mu and Yang, Jianwei and Gao, Jianfeng and Lee, Yong Jae},
  journal={Proceedings of the International Conference on Learning Representation},
  year={2025}
}
Acknowledgement
Vicuna: the langauge model we built upon, and our base model Vicuna-13B that has the amazing language capabilities!
LLaVa: the codebase we built upon, which has amazing multimodal abalities!
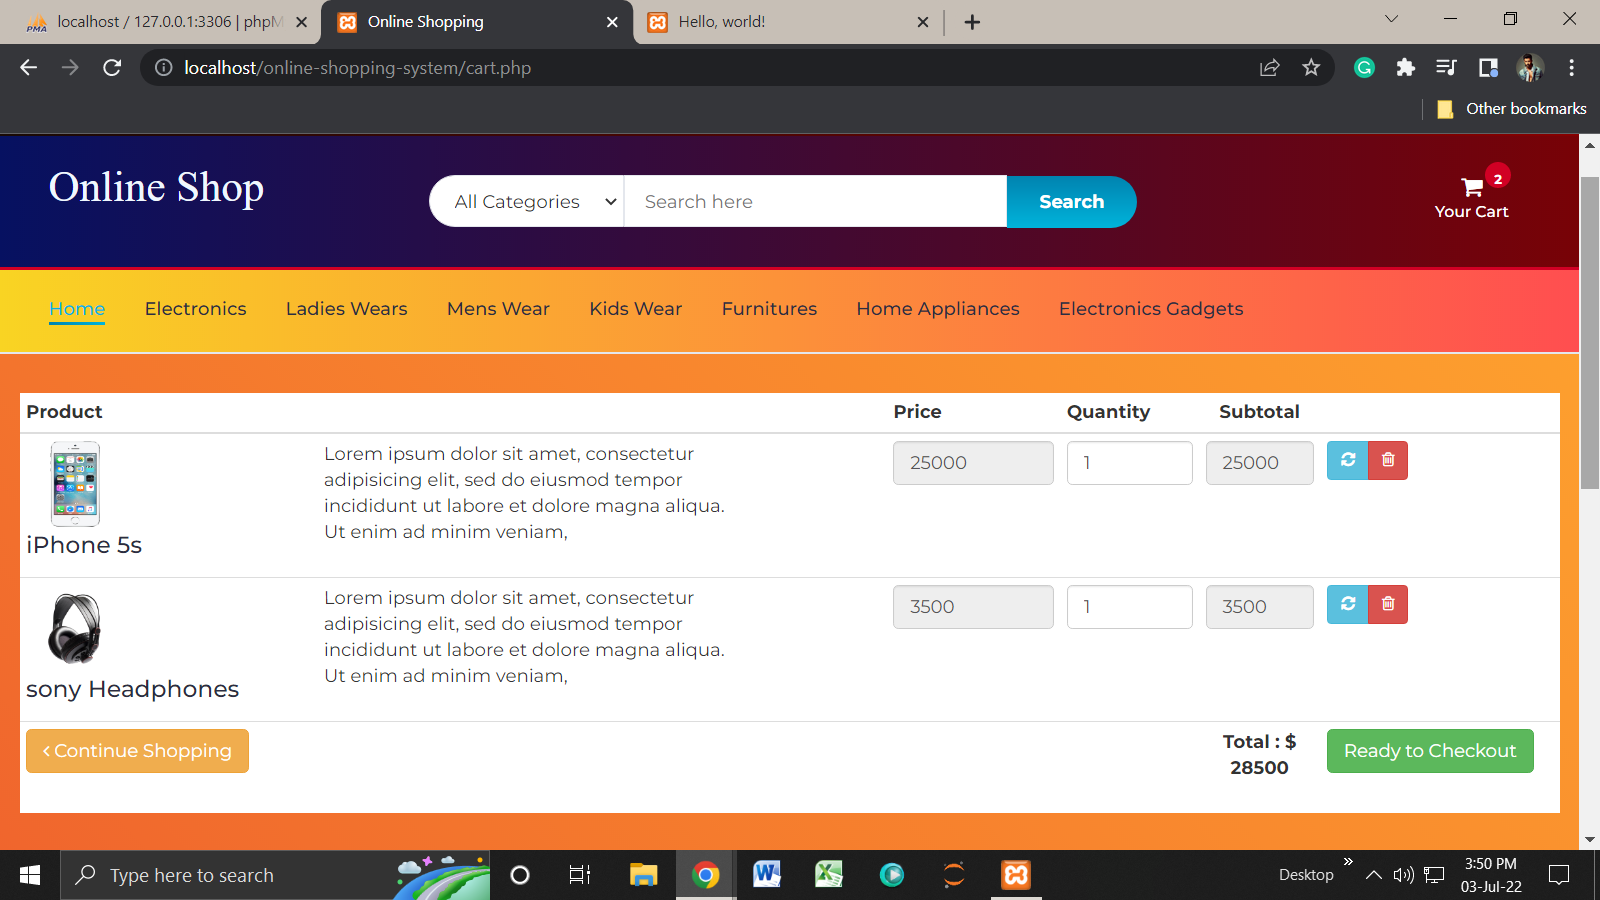
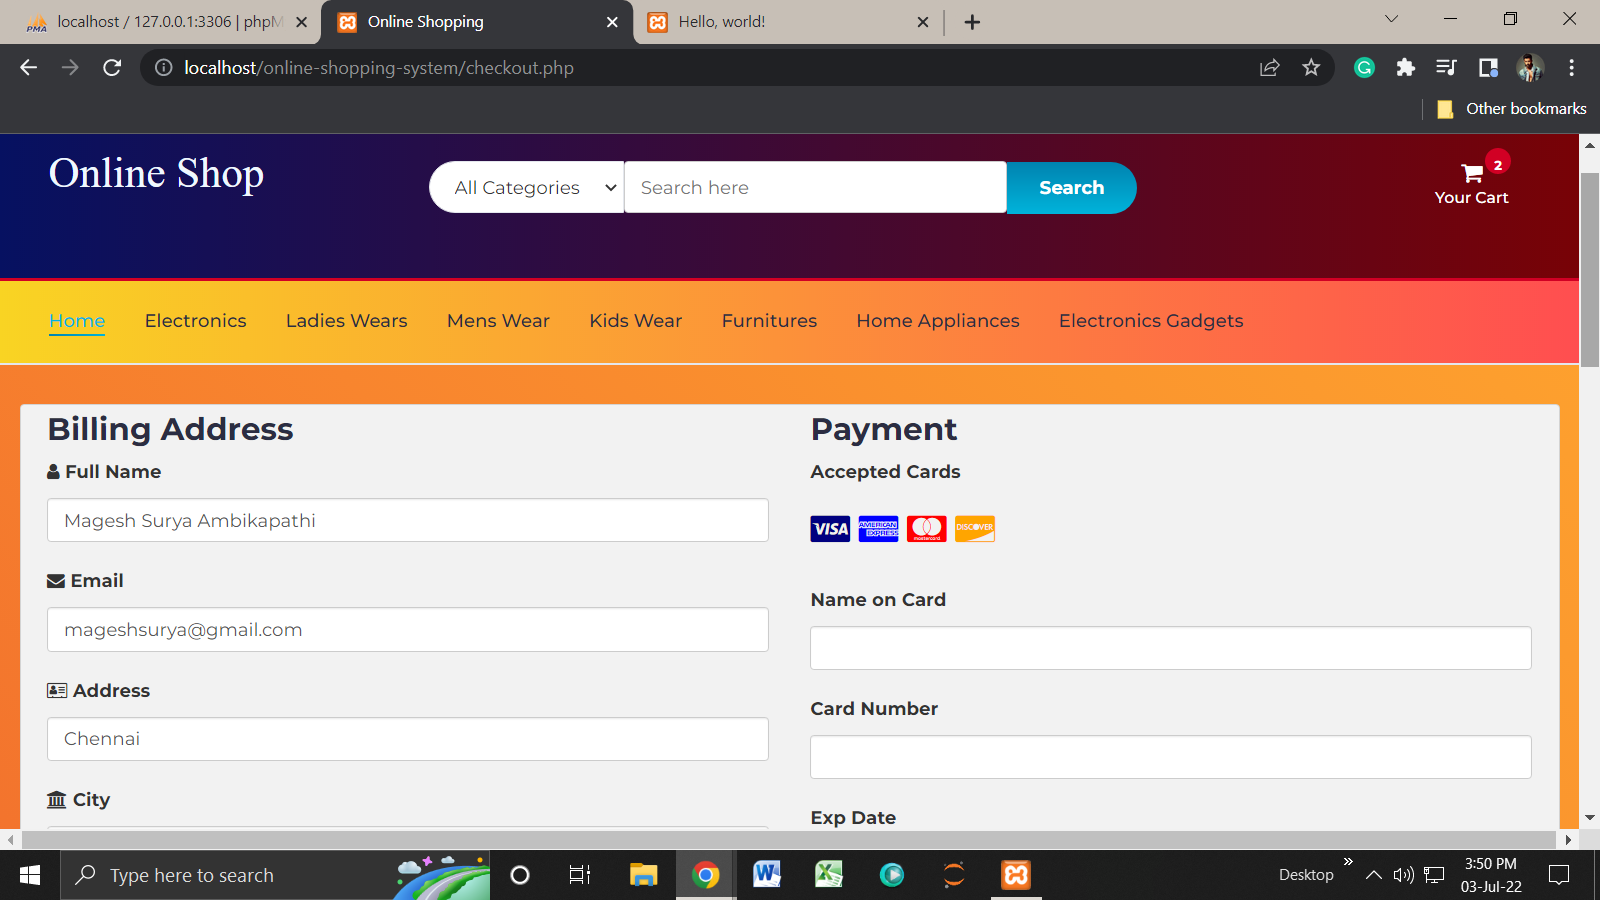
Online shopping is a form of electronic commerce which allows consumers to directly buy goods or services from a seller over the Internet using a web browser or a mobile app.
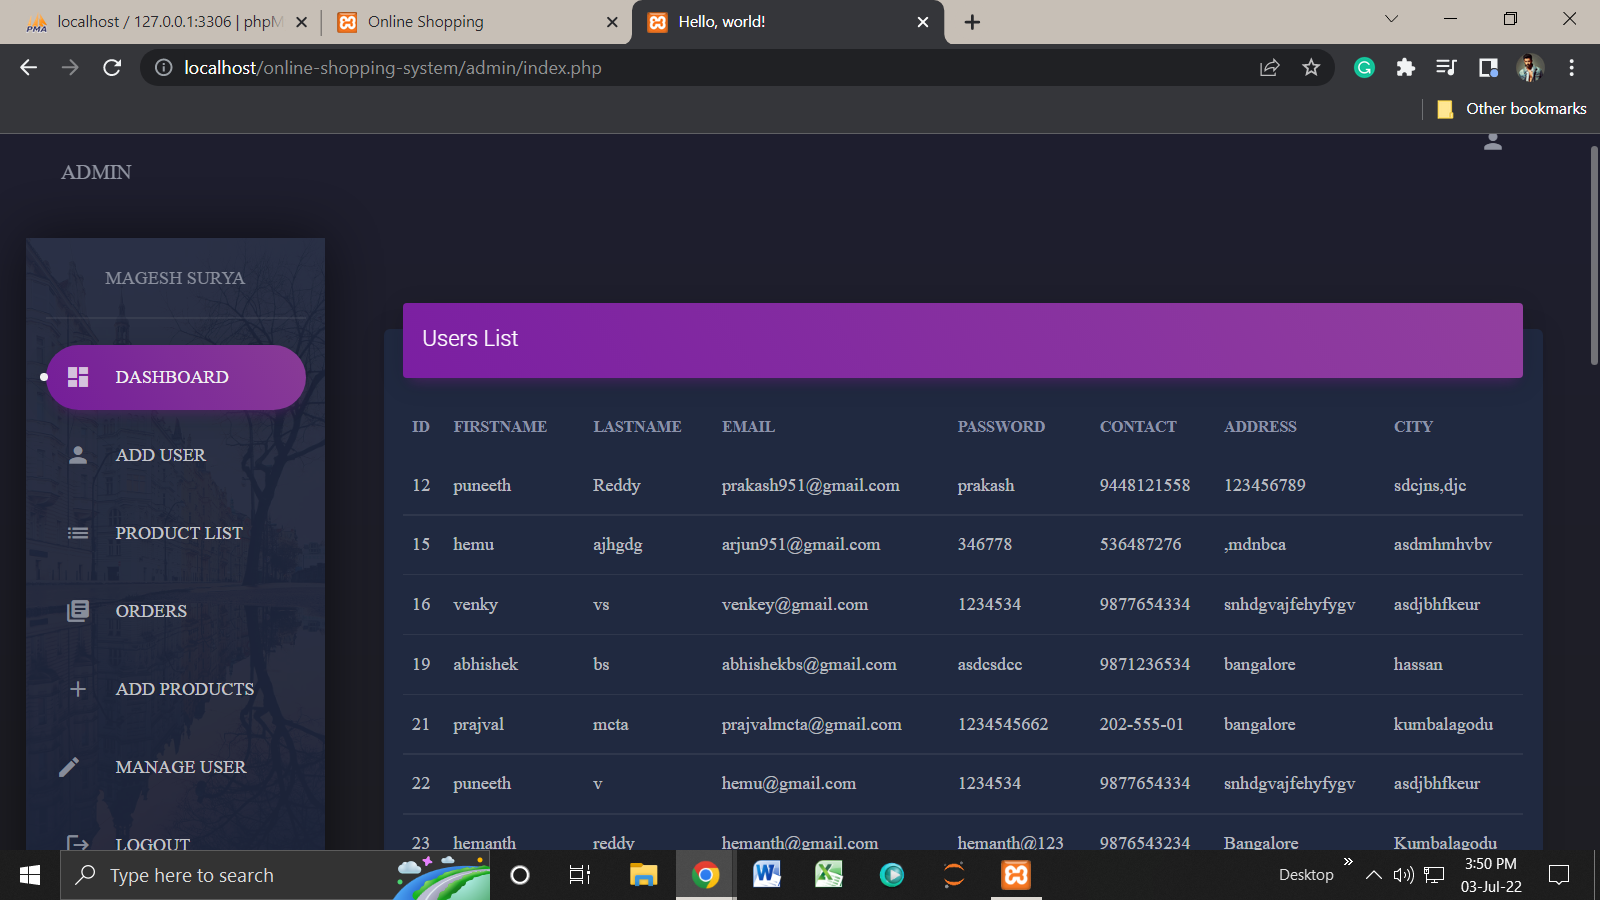
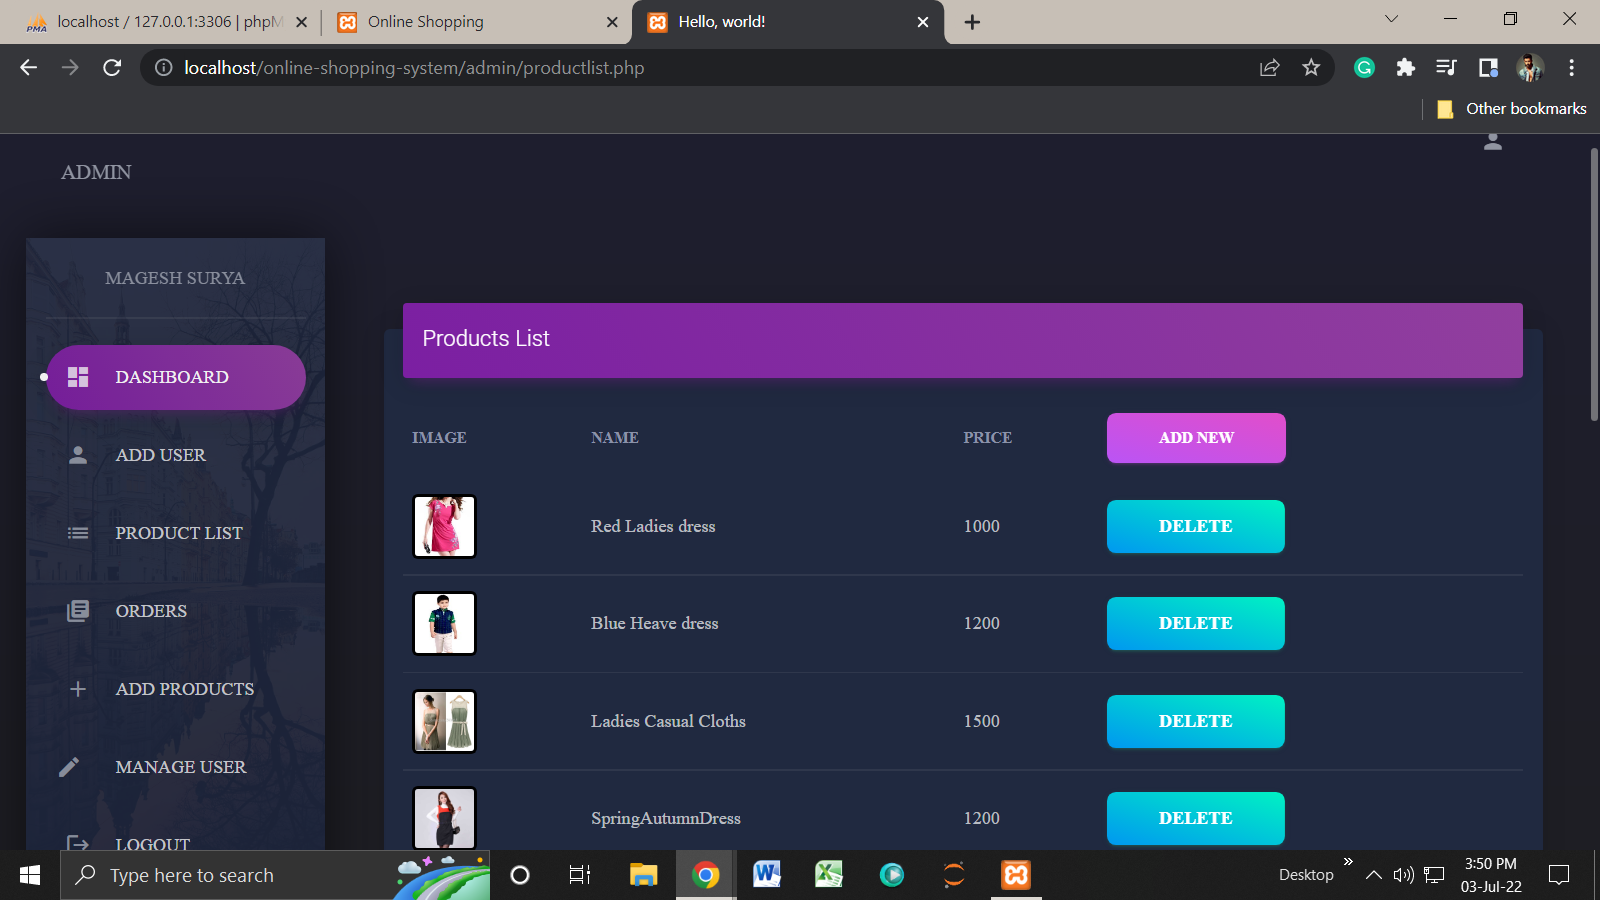
The Online Shopping System in PHP using XAMPP as virtual Server.
This project contains the admin side and user side where a user can view shopping items details, sign up, and buy products online. While the admin can add items and users, products, manage them, and soon.
Talking about the features of this system, the admin can manage the users, products, and check subscribers. While the user can shop for all the available shopping items by signing in. And, in order to buy products online, he/she has to sign up/in through the system.
The user can shop for multiple items and pay online through cards. This simple project is similar to the online shop portal. The design of this project is very simple so that the user won’t find any difficulties while working on it.
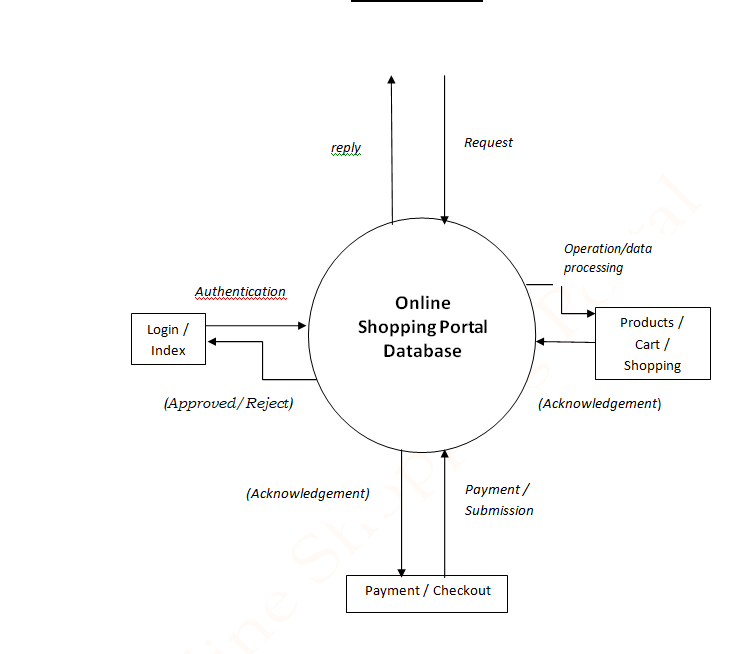
Flow Chart:
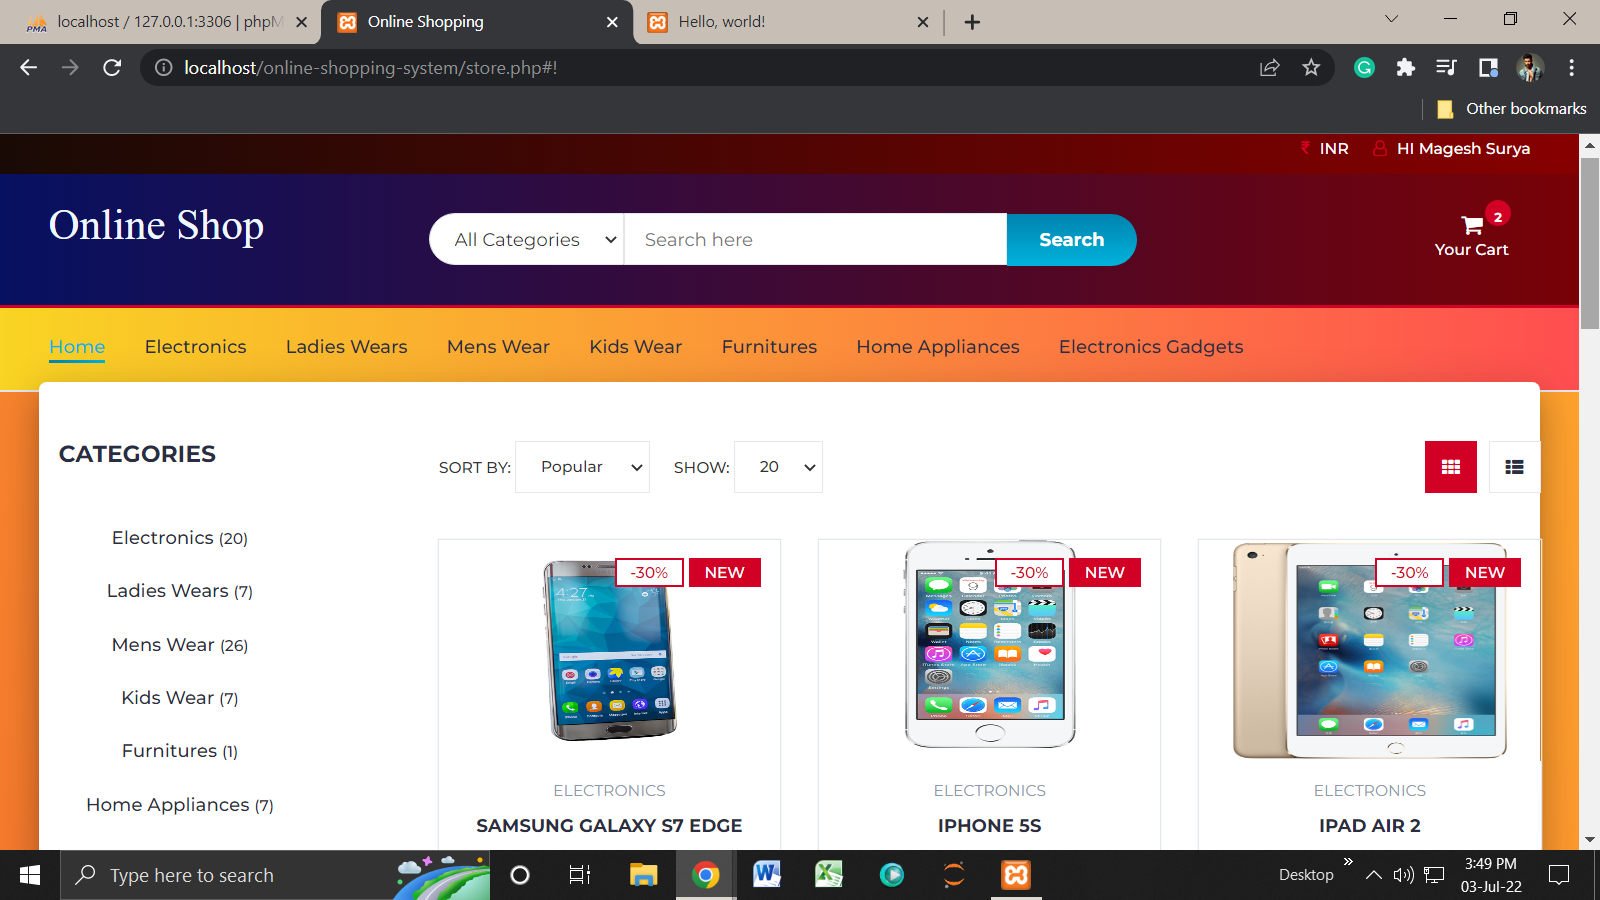
Images of the Webpage:
Homepage:
Product Checkout:
Payment Gateway:
Admin Page:
Video for Presentation of Online Shopping Site(Ecommerce)


 https://github.com/jlp6k/faust-things