Author: sbyd2umjwvnz

  • PyTorch-ENet

    PyTorch-ENet

    PyTorch (v1.1.0) implementation of ENet: A Deep Neural Network Architecture for Real-Time Semantic Segmentation, ported from the lua-torch implementation ENet-training created by the authors.

    This implementation has been tested on the CamVid and Cityscapes datasets. Currently, a pre-trained version of the model trained in CamVid and Cityscapes is available here.

    Dataset Classes 1 Input resolution Batch size Epochs Mean IoU (%) GPU memory (GiB) Training time (hours)2
    CamVid 11 480×360 10 300 52.13 4.2 1
    Cityscapes 19 1024×512 4 300 59.54 5.4 20

    1 When referring to the number of classes, the void/unlabeled class is always excluded.
    2 These are just for reference. Implementation, datasets, and hardware changes can lead to very different results. Reference hardware: Nvidia GTX 1070 and an AMD Ryzen 5 3600 3.6GHz. You can also train for 100 epochs or so and get similar mean IoU (± 2%).
    3 Test set.
    4 Validation set.

    Installation

    Local pip

    1. Python 3 and pip
    2. Set up a virtual environment (optional, but recommended)
    3. Install dependencies using pip: pip install -r requirements.txt

    Docker image

    1. Build the image: docker build -t enet .
    2. Run: docker run -it --gpus all --ipc host enet

    Usage

    Run main.py, the main script file used for training and/or testing the model. The following options are supported:

    python main.py [-h] [--mode {train,test,full}] [--resume]
                   [--batch-size BATCH_SIZE] [--epochs EPOCHS]
                   [--learning-rate LEARNING_RATE] [--lr-decay LR_DECAY]
                   [--lr-decay-epochs LR_DECAY_EPOCHS]
                   [--weight-decay WEIGHT_DECAY] [--dataset {camvid,cityscapes}]
                   [--dataset-dir DATASET_DIR] [--height HEIGHT] [--width WIDTH]
                   [--weighing {enet,mfb,none}] [--with-unlabeled]
                   [--workers WORKERS] [--print-step] [--imshow-batch]
                   [--device DEVICE] [--name NAME] [--save-dir SAVE_DIR]
    

    For help on the optional arguments run: python main.py -h

    Examples: Training

    python main.py -m train --save-dir save/folder/ --name model_name --dataset name --dataset-dir path/root_directory/
    

    Examples: Resuming training

    python main.py -m train --resume True --save-dir save/folder/ --name model_name --dataset name --dataset-dir path/root_directory/
    

    Examples: Testing

    python main.py -m test --save-dir save/folder/ --name model_name --dataset name --dataset-dir path/root_directory/
    

    Project structure

    Folders

    • data: Contains instructions on how to download the datasets and the code that handles data loading.
    • metric: Evaluation-related metrics.
    • models: ENet model definition.
    • save: By default, main.py will save models in this folder. The pre-trained models can also be found here.

    Files

    • args.py: Contains all command-line options.
    • main.py: Main script file used for training and/or testing the model.
    • test.py: Defines the Test class which is responsible for testing the model.
    • train.py: Defines the Train class which is responsible for training the model.
    • transforms.py: Defines image transformations to convert an RGB image encoding classes to a torch.LongTensor and vice versa.

    Visit original content creator repository
    https://github.com/davidtvs/PyTorch-ENet

  • imaqdx-dotnet

    Visit original content creator repository
    https://github.com/ghas-results/imaqdx-dotnet

  • Generics

    Generics

    ####Generics allow the reuse of code across different types.
    For example, let’s declare a method that swaps the values of its two parameters:

    static void Swap(ref int a, ref int b) {
      int temp = a;
      a = b;
      b = temp;
    }

    ####Our Swap method will work only for integer parameters. If we want to use it for other types, for example, doubles or strings, we have to overload it for all the types we want to use it with. Besides a lot of code repetition, it becomes harder to manage the code because changes in one method mean changes to all of the overloaded methods.
    Generics provide a flexible mechanism to define a generic type.

    static void Swap<T>(ref T a, ref T b) {
      T temp = a;
      a = b;
      b = temp;
    }

    ####In the code above, T is the name of our generic type. We can name it anything we want, but T is a commonly used name. Our Swap method now takes two parameters of type T. We also use the T type for our temp variable that is used to swap the values.
    Note the brackets in the syntax <T>, which are used to define a generic type.

    ###Generic Methods

    ####Now, we can use our Swap method with different types, as in:

    static void Swap<T>(ref T a, ref T b) {
      T temp = a;
      a = b;
      b = temp;
    }
    static void Main(string[] args) {
      int a = 4, b = 9;
      Swap<int>(ref a, ref b);
      //Now b is 4, a is 9
    
      string x = "Hello";
      string y = "World";
      Swap<string>(ref x, ref y);
      //Now x is "World", y is "Hello"
    }

    ####When calling a generic method, we need to specify the type it will work with by using brackets. So, when Swap is called, the T type is replaced by int. For Swap <string>, T is replaced by string.
    If you omit specifying the type when calling a generic method, the compiler will use the type based on the arguments passed to the method.
    Multiple generic parameters can be used with a single method.
    For example: Func <T, U> takes two different generic types.

    ###Generic Classes

    ####Generic types can also be used with classes.
    The most common use for generic classes is with collections of items, where operations such as adding and removing items from the collection are performed in basically the same way regardless of the type of data being stored. One type of collection is called a stack. Items are “pushed”, or added to the collection, and “popped”, or removed from the collection. A stack is sometimes called a Last In First Out (LIFO) data structure.
    For example:

    class Stack<T> {
      int index=0;
      T[] innerArray = new T[100];
      public void Push(T item) {
        innerArray[index++] = item; 
      }
      public T Pop() {
        return innerArray[--index]; 
      }
      public T Get(int k) { return innerArray[k]; }
    }

    ####The generic class stores elements in an array. As you can see, the generic type T is used as the type of the array, the parameter type for the Push method, and the return type for the Pop and Get methods.
    Now we can create objects of our generic class:

    Stack<int> intStack = new Stack<int>();
    Stack<string> strStack = new Stack<string>();
    Stack<Person> PersonStack = new Stack<Person>();

    ####We can also use the generic class with custom types, such as the custom defined Person type.
    In a generic class we do not need to define the generic type for its methods, because the generic type is already defined on the class level.

    Generic class methods are called the same as for any other object:

    Stack<int> intStack = new Stack<int>();
    intStack.Push(3);
    intStack.Push(6);
    intStack.Push(7);
                
    Console.WriteLine(intStack.Get(1));
    //Outputs 6

    ###Collections

    ####The .NET Framework provides a number of generic collection classes, useful for storing and manipulating data.
    These classes are contained in the System.Collections.Generic namespace.
    List is one of the commonly used collection classes:

    List<string> colors = new List<string>();
    colors.Add("Red");
    colors.Add("Green");
    colors.Add("Pink");
    colors.Add("Blue");
    
    foreach (var color in colors) {
      Console.WriteLine(color);
    }
    /*Outputs
    Red
    Green
    Pink
    Blue
    */

    ####We defined a List that stores strings and iterated through it using a foreach loop.
    The List class contains a number of useful methods:
    Add adds an element to the List.
    Clear removes all elements from the List.
    Contains determines whether the specified element is contained in the List.
    Count returns the number of elements in the List.
    Insert adds an element at the specified index.
    Reverse reverses the order of the elements in the List.
    So why use Lists instead of arrays?
    Because, unlike arrays, the group of objects you work with in a collection can grow and shrink dynamically.

    Commonly used generic collection types include:

    • Dictionary` represents a collection of key/value pairs that are organized based on the key.
    • List represents a list of objects that can be accessed by index. Provides methods to search, sort, and modify lists.
    • Queue represents a first in, first out (FIFO) collection of objects.
    • Stack represents a last in, first out (LIFO) collection of objects.

    Choose the type of collection class based on the data you need to store and the operations you need.
    “`C#
    List a = new List();
    a.Add(5);
    a.Add(2);
    a.Add(8);
    a.Reverse();
    Console.Write(a[1]);
    “`

    Visit original content creator repository
    https://github.com/SatSargsyan/Generics

  • Grams

    Grams: Gradient Descent with Adaptive Momentum Scaling (ICLR 2025 SCOPE Workshop)

    arXiv PyPI - Version

    Authors: Yang Cao, Xiaoyu Li, Zhao Song

    This repository contains the official PyTorch implementation for Grams optimizer.

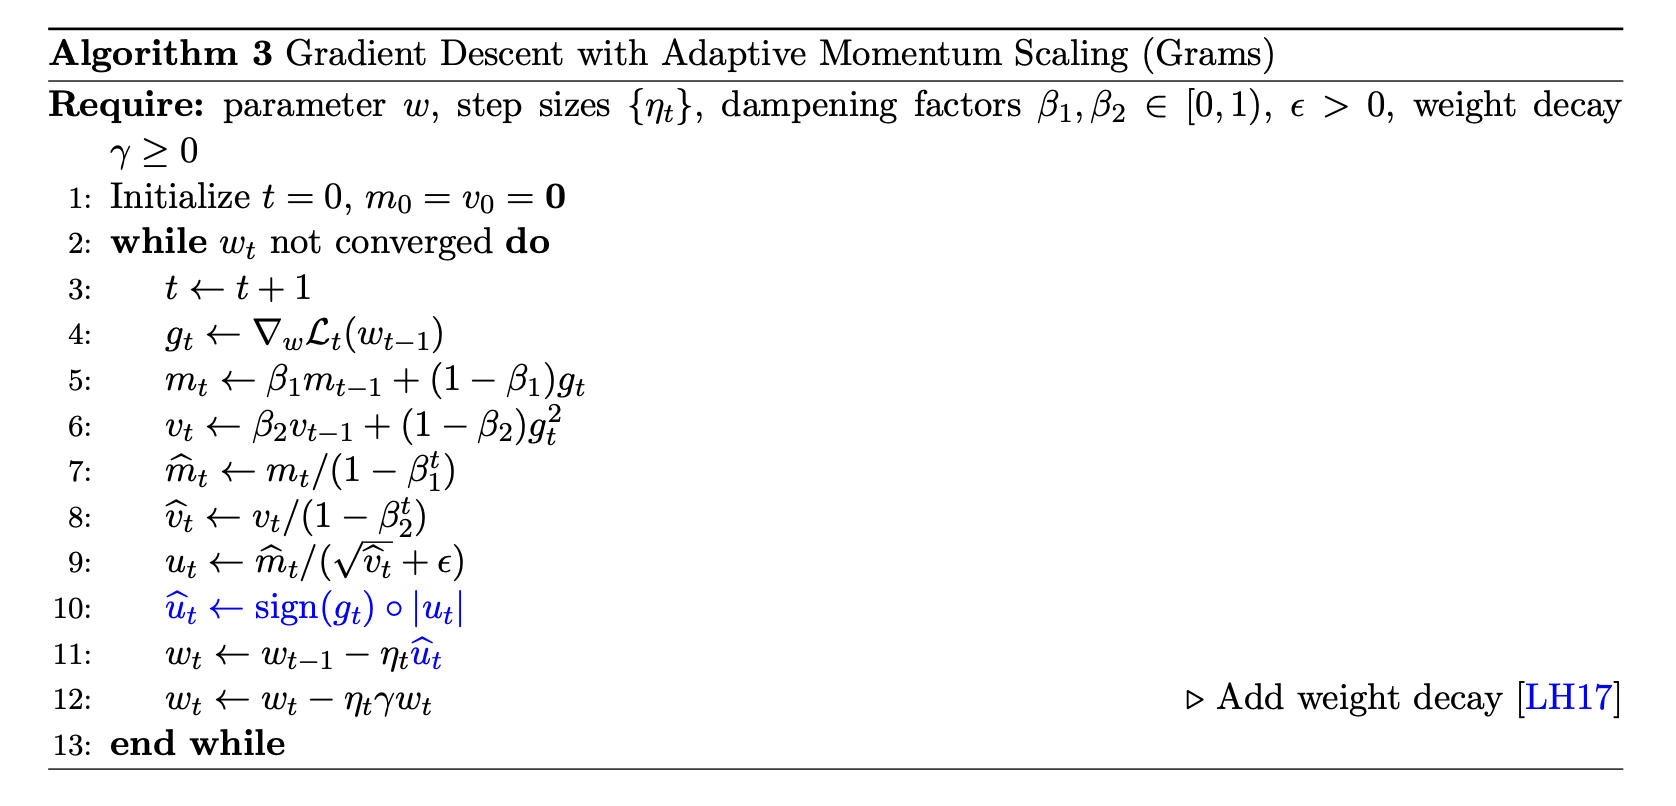
    We introduce Gradient Descent with Adaptive Momentum Scaling (Grams), a novel optimization algorithm that decouples the direction and magnitude of parameter updates in deep learning. Unlike traditional optimizers that directly integrate momentum into updates, Grams separates the update direction, derived from current gradients, from momentum, which is used solely for adaptive magnitude scaling. This approach enables Grams to achieve improved loss descent compared to state-of-the-art cautious and momentum-based optimizers.

    image

    Install

    Use the following command to install our pytorch implementation for Grams:

    pip install grams-pytorch

    How to use Grams

    Switching from Adam/AdamW to Grams is simple and requires only two lines of code:

    Before:

    import torch
    optimizer = torch.optim.adam(model.parameters(), lr=1e-3, weight_decay=0.0)

    Switching to Grams:

    from grams import Grams
    optimizer = Grams(model.parameters(), lr=1e-3, weight_decay=0.0)

    Just import Grams and swap the optimizer—everything else remains the same!

    Citation

    Please cite our work!

    @inproceedings{cao2025grams,
    title={Grams: Gradient Descent with Adaptive Momentum Scaling},
    author={Yang Cao and Xiaoyu Li and Zhao Song},
    booktitle={ICLR 2025 First Workshop on Scalable Optimization for Efficient and Adaptive Foundation Models},
    year={2025},
    url={https://openreview.net/forum?id=GmKQnpQdsc}
    }
    Visit original content creator repository https://github.com/Gunale0926/Grams
  • senso4s-home-assistant

    Senso4s Home Assistant integration

    hacs workflow

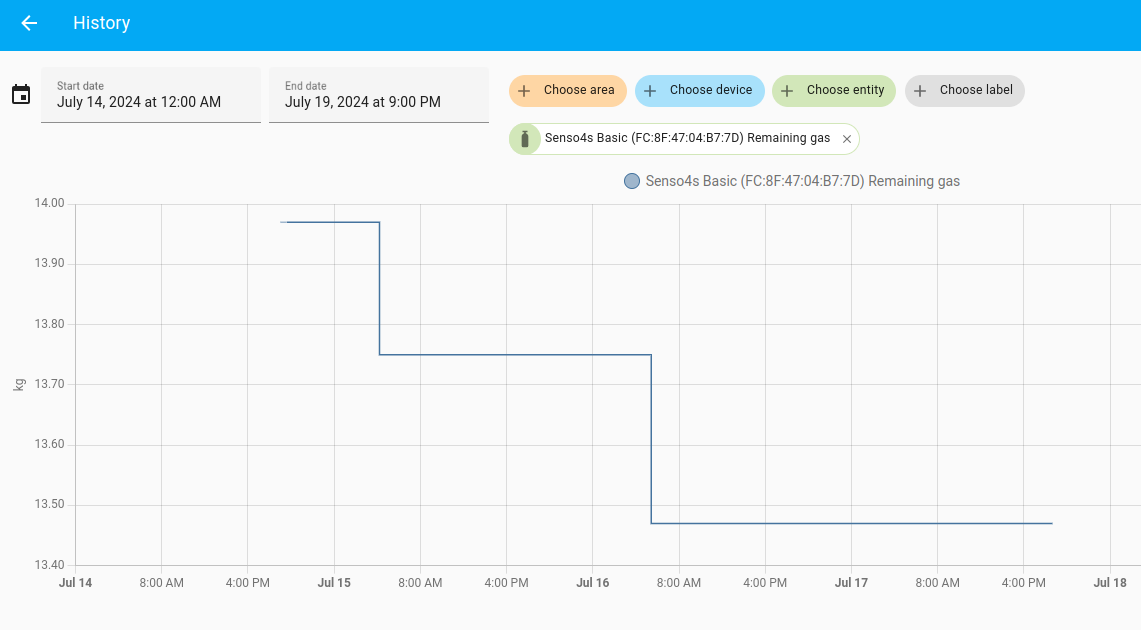
    This integration adds support for the Senso4s PLUS and Senso4s BASIC smart gas level solutions to Home Assistant. Senso4s devices use Bluetooth to communicate, so your Home Assistant installation needs to have a Bluetooth adapter or Bluetooth Proxy available. Setup of a Senso4s device is done using the Senso4s Android App or Senso4s iOS App. After the setup of a Senso4s device is completed, you can check the remaining gas level, gas level consumption history, estimated running-out-of-gas time, battery status, and other parameters either via the Senso4s app or this Home Assistant integration.

    Note

    This integrations connects to the Senso4s device to read out its characteristics. Therefore broadcast-only proxies are not supported.

    Quick Install using HACS

    You must have HACS installed: https://hacs.xyz/docs/use/

    Click the button below to add the Senso4s integration to your Home Assistant.

    Open your Home Assistant instance and open a repository inside the Home Assistant Community Store.

    After adding the Senso4s integration to HACS, you can click Download on the Senso4s repository. Once done, you will be requested to restart Home Assistant.

    Manual Installation

    • Clone this repository.
    • Copy the directory custom_components/senso4s to the custom_components directory of your Home Assistant installation.
    • Restart Home Assistant.

    Adding a Senso4s device to Home Assistant

    • In the Home Assistant’s web UI, go to Settings, Devices & Services.
    • In the bottom right-hand corner, click on + Add integration.
    • In the search box type Senso4s, and choose Senso4s in the list shown. ** If nothing is found, review the installation steps.
    • The following screen will show all Bluetooth devices that have been recognised as manufactured by Senso4s. ** If you do not see any devices listed, or the message “No devices found on the network”, try going closer to your Senso4s device.
    • After selecting your Senso4s device from the list, the Home Assistant will attempt to read the data. Once done, you will be greeted by a screen asking which place your Senso4s device should be associated with. You can choose a place or skip this step.

    View data

    • After the device has been added, go to Settings, Devices & Services, and select Senso4s.
    • You should see the Senso4s device with its MAC address listed.
    • Under the device it should read “1 device and 10 entities”.
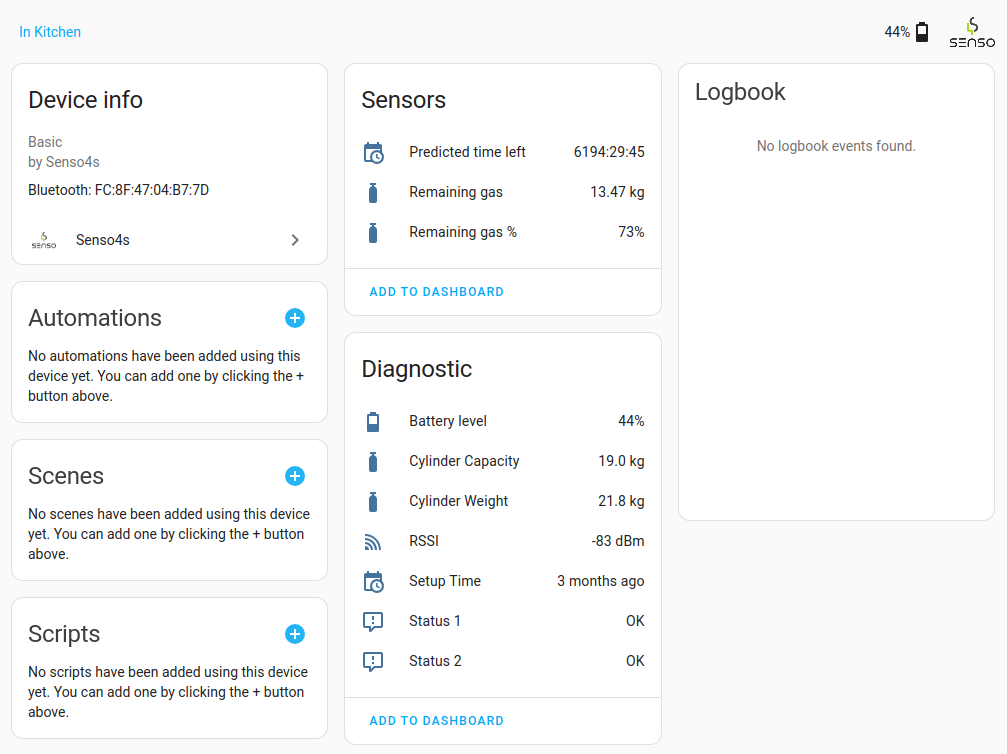
    • Click on the “1 device” hyperlink to see a summary of all the Senso4s device’s parameters.
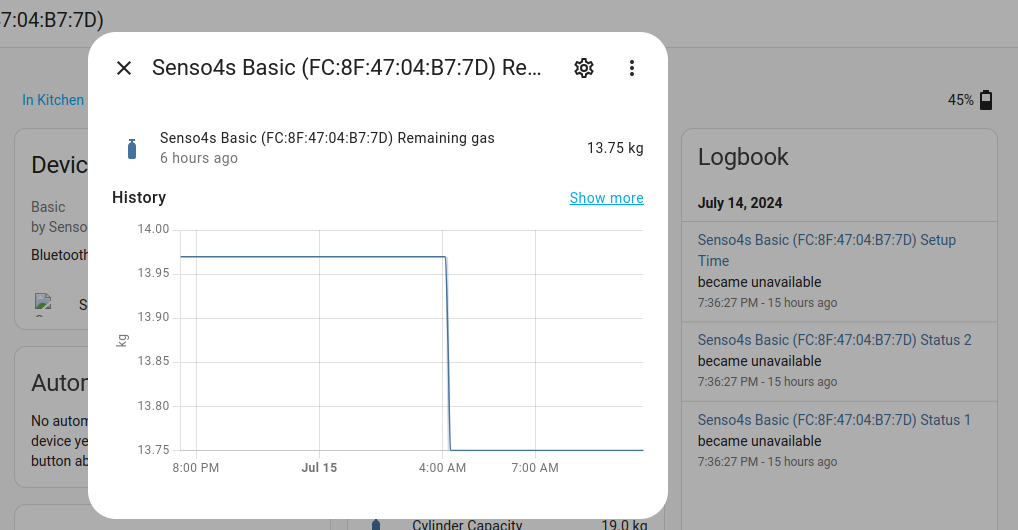
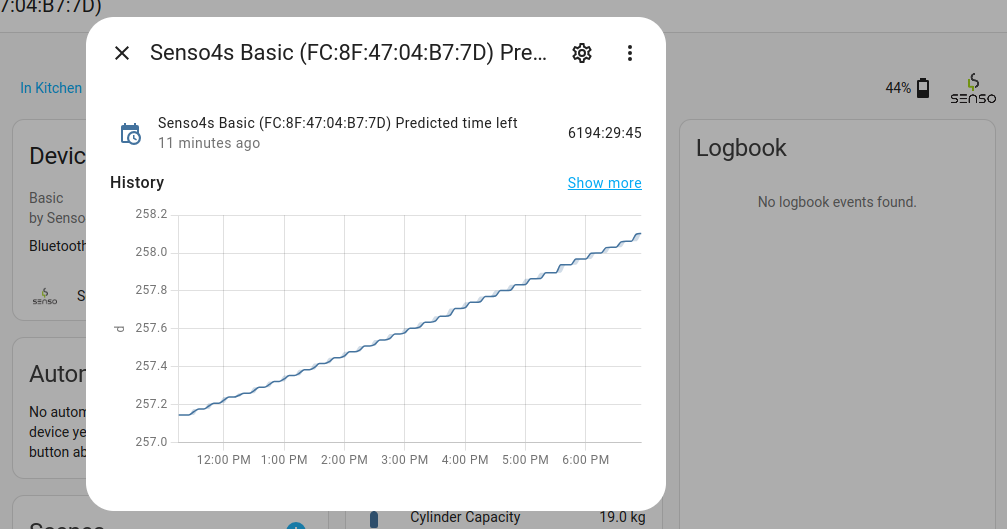
    • You can click on any of the parameters to see a chart showing its changes over time.

    device-summary

    prediction

    gas-history

    gas-history-long

    Visit original content creator repository https://github.com/jpmeijers/senso4s-home-assistant
  • CircuitPython_Button_Handler

    Introduction

    Documentation Status Discord Build Status Code Style: Ruff

    This helper library simplifies the usage of buttons with CircuitPython, by detecting and differentiating button inputs, returning a set of the inputs and calling their corresponding functions.

    Dependencies

    This driver depends on:

    Please ensure all dependencies are available on the CircuitPython filesystem. This is easily achieved by downloading the Adafruit library and driver bundle or individual libraries can be installed using circup.

    Installing from PyPI

    On supported GNU/Linux systems like the Raspberry Pi, you can install the driver locally from PyPI. To install for current user:

    pip3 install circuitpython-button-handler

    To install system-wide (this may be required in some cases):

    sudo pip3 install circuitpython-button-handler

    To install in a virtual environment in your current project:

    mkdir project-name && cd project-name
    python3 -m venv .venv
    source .env/bin/activate
    pip3 install circuitpython-button-handler

    Installing to a Connected CircuitPython Device with Circup

    Make sure that you have circup installed in your Python environment. Install it with the following command if necessary:

    pip3 install circup

    With circup installed and your CircuitPython device connected use the following command to install:

    circup install button_handler

    Or the following command to update an existing version:

    circup update

    Usage Example

    This simple script showcases the usage of this library using a single button.

    Button wiring
    GND
    D9
    import time
    
    import board
    from keypad import Keys
    
    from button_handler import ButtonHandler
    
    
    def double_press():
        print("Double press detected!")
    
    
    def short_press():
        print("Short press detected!")
    
    
    def long_press():
        print("Long press detected!")
    
    
    def hold():
        print("The button began being held down!")
    
    
    actions = {
        "DOUBLE_PRESS": double_press,
        "SHORT_PRESS": short_press,
        "LONG_PRESS": long_press,
        "HOLD": hold,
    }
    
    scanner = Keys([board.D9], value_when_pressed=False)
    button_handler = ButtonHandler(scanner.events, actions)
    
    
    while True:
        button_handler.update()
        time.sleep(0.0025)

    Documentation

    API documentation for this library can be found on Read the Docs.

    For information on building library documentation, please check out this guide.

    Contributing

    Contributions are welcome! Please read our Code of Conduct before contributing to help this project stay welcoming.

    The easiest way to contribute to the repository is by creating an issue. Add a concise title and then explain the issue or suggestion in more detail in the description. This is helpful even if you do not intend to develop a fix. If you wish to do so, however, the repository must first be forked.

    Forking the repository

    In order to add commits to this repository, it must be forked first. This creates a copy of the repository you can edit. Make sure to deselect “Copy the main branch only”.

    The following steps explain the recommended approach to working on a fork. Git needs to be installed for this.

    1. Clone the repository.

      Open a terminal in the directory where you wish to clone the fork, and then run the following:

      git clone https://github.com/<your-github-username>/CircuitPython_Button_Handler.git

      Keep in mind the URL will be different if you changed the fork’s name.

    2. Set pre-commit up.

      This repository is set up with tools that assist in development by automatically formatting code, enforcing code standards and fixing issues where possible.

      For these tools to run automatically before committing, pre-commit has to be installed. This can be done in a virtual environment in order to maintain a cleaner development setup. Using a virtual environment isolates dependencies, ensuring they don’t conflict with other projects.

      To install pre-commit in a Python virtual environment:

      1. Ensure Python is installed in your system.

        You can check your version of Python with the following command:

        python --version
      2. Create a Python virtual environment.

        To make a virtual environment of name .venv in the current directory, run:

        python -m venv .venv
      3. Activate the virtual environment.

        • On Windows, run:

          .\.venv\Scripts\activate
        • On Linux or macOS, run:

          source .venv/bin/activate

        To avoid repeating this step every time a terminal is opened in this directory, configure your IDE to use the .venv virtual environment as the default interpreter. In Visual Studio Code, this can be done by opening the command palette, typing Python: Select Interpreter and selecting the .venv virtual environment.

      4. Install pre-commit.

        This can easily be achieved by executing:

        pip install pre-commit
        pre-commit install

        After installing pre-commit, the necessary hooks are installed on the next git commit or the next time pre-commit run is executed.

    3. Create a new branch.

      To make a new branch from the dev branch:

      git checkout dev
      git branch -b <branch-name>

      For consistency, please name the branch the same as the issue it addresses with the number of the issue preceding the name. Write the name in kebab-case and with no special characters (underscores are allowed).

      For example, the branch for issue #26 “Update .readthedocs.yaml with Sphinx key” was “26-update-readthedocsyaml-with-sphinx-key”.

    4. Commit your changes.

      After adding your changes, commit them to the new branch by executing:

      git add .
      git commit

      When ready, push the changes to GitHub with the following commands:

      git remote add origin https://github.com/<your-github-username>/CircuitPython_Button_Handler.git
      git push --set-upstream origin <branch-name>
    5. Open a pull request.

      Upon opening (or refreshing) the fork’s GitHub page, a message should be visible close to the top of the page:

      This branch is 1 commit ahead of EGJ-Moorington/CircuitPython_Button_Handler:main.

      Firstly, ensure the branch is up to date by pressing “Sync fork”. Then, select “Contribute” > “Open pull request”.

      The page will show “Open a pull request”. Make sure to select base: dev and compare: <your-branch-name> in the dropdowns.

      Write a brief title and then explain the changes in the description. Finish by using a closing keyword for your issue.

    Visit original content creator repository https://github.com/EGJ-Moorington/CircuitPython_Button_Handler
  • gatsby-multilang-template

    Multilanguage Page with URL Prefixes

    I need to configure NGINX to serve a multilanguage website with URL prefixes like /en/, /fr/ and /de/. For this I want to use the default Gatsby Starter to create some static HTML that I can serve to test my NGINX configuration.

    Page Structure

    /public

    ├── de
    │  ├── index.html
    │  └── sub-page
    │     └── index.html
    ├── en
    │  ├── index.html
    │  └── sub-page
    │     └── index.html
    ├── favicon.ico
    ├── fr
    │  ├── index.html
    │  └── sub-page
    │     └── index.html
    ├── index.html
    ├── page-data
    │  ├── app-data.json
    │  ├── de
    │  │  ├── page-data.json
    │  │  └── sub-page
    │  │     └── page-data.json
    │  ├── en
    │  │  ├── page-data.json
    │  │  └── sub-page
    │  │     └── page-data.json
    │  ├── fr
    │  │  ├── page-data.json
    │  │  └── sub-page
    │  │     └── page-data.json
    │  └── index
    │     └── page-data.json

    NGINX Configuration

    /nginx

    ├── conf.d
    │  ├── buffers.conf
    │  ├── cache.conf
    │  ├── default.conf
    │  ├── gzip.conf
    │  ├── header.conf
    │  ├── self-signed.conf
    │  ├── ssl-params.conf
    │  └── timeouts.conf
    ├── nginx.conf
    └── ssl
       ├── dhparam.pem
       ├── nginx-selfsigned.crt
       └── nginx-selfsigned.key

    nginx.conf

    user  nginx;
    worker_processes  auto;
    worker_rlimit_nofile  15000;
    pid  /var/run/nginx.pid;
    include /usr/share/nginx/modules/*.conf;
    
    
    events {
        worker_connections  2048;
        multi_accept on;
        use epoll;
    }
    
    
    http {
        default_type   application/octet-stream;
        # access_log   /var/log/nginx/access.log;
        # activate the server access log only when needed
        access_log     off;
        error_log      /var/log/nginx/error.log;
        # don't display server version on error pages
        server_tokens  off;
        server_names_hash_bucket_size 64;
        include        /etc/nginx/mime.types;
        sendfile       on;
        tcp_nopush     on;
        tcp_nodelay    on;
    
        charset utf-8;
        source_charset utf-8;
        charset_types text/xml text/plain text/vnd.wap.wml application/javascript application/rss+xml;
        
        include /etc/nginx/conf.d/default.conf;
        include /etc/nginx/conf.d/buffers.conf;
        include /etc/nginx/conf.d/timeouts.conf;
        include /etc/nginx/conf.d/gzip.conf;
        # Only activate caching in production
        # include /etc/nginx/conf.d/cache.conf;
    }
    

    default.conf

    /etc/nginx/conf.d/default.conf

    server {
        listen 80;
        listen [::]:80;
    
        server_name 192.168.2.111;
    
        return 301 https://$server_name$request_uri;
    }
    
    server {
        listen      443 ssl;
        listen      [::]:443 ssl;
        include     conf.d/self-signed.conf;
        include     conf.d/ssl-params.conf;
        include     conf.d/header.conf;
    
        server_name 192.168.2.111;
    
        root         /opt/test-static/public;
        index        index.html;
    
        location = / {
            rewrite   ^/(.*)$  /zabbix/$1  permanent;
        }
        
        location /en/ {
            try_files  $uri $uri/ $uri.html =404; 
        }
        
        location /de/ {
            try_files  $uri $uri/ $uri.html =404; 
            
        }
        
        location /fr/ {
            try_files  $uri $uri/ $uri.html =404;
        }
    
        error_page  404              /404.html;
        error_page  500 502 503 504  /50x.html;
        location = /50x.html {
            root   /usr/share/nginx/html;
        }
    }
    

    Setup with Ansible

    ---
    - hosts: test
      tasks:
        - name: Aptitude Update
          apt: update_cache=yes
    
        - name: Add NGINX user
          user:
            name: nginx
            comment: NGINX User
            group: nginx
            shell: /bin/sh
            home: /home/nginx
    
        - name: Installing NGINX
          apt: pkg=nginx state=present update_cache=no
    
        - name: Stop NGINX Service
          service: name=nginx state=stopped 
            
        - name: Copy the NGINX Configuration
          copy:
            src: "{{ item.src }}"
            dest: "{{ item.dest }}"
            mode: "{{item.mode}}"
          with_items:
            - { src: '/opt/test-static/nginx/nginx.conf',dest: '/etc/nginx/nginx.conf', mode: '0664'}
            - { src: '/opt/test-static/nginx/conf.d/',dest: '/etc/nginx/conf.d', mode: '0664'}
            - { src: '/opt/test-static/nginx/ssl/',dest: '/etc/nginx/ssl', mode: '0664'}
          notify:
            - Start NGINX    
    
      handlers:
        - name: Start NGINX
          service: name=nginx state=restarted
          # notify:
          #   - Verify that NGINX did not crash
    
        # - name: Verify that NGINX did not crash
        #   shell: service nginx status
        #   register: result
        #   until: result.stdout.find("active (running)") != -1
        #   retries: 5
        #   delay: 5

    Visit original content creator repository
    https://github.com/mpolinowski/gatsby-multilang-template

  • wt-cli-workflow

    wtw – WebTask Workflow

    A simple workflow for the Webtask CLI

    Quickstart

    Assuming you already know and have a Webtask account:

    npm i -g wt-cli
    npm i -g wtw
    wtw --help
    wt init

    This last command will go trough the account setup to use the remote runtimes provided by webtask.io

    Now, let’s create a remote webtask from an existing file (wraps ‘wt create’):

    wtw create myfile.js

    You can read about motivations and general conventions

    Usage

    Pre-requisites

    Obviously, Webtask is required. The setup takes 1 minute
    Create an account and a install a CLI with npm following this instructions

    Once the basic environment has been setup, working with serverless functions is mostly about:

    1. Creating a new function (not very often)
    2. code, test, deploy, release (most of the time)

    Well, exactly what happens in any other kind of development, right?
    Webtask cli offer great foundamentals but in real world there are 2 things we almost always need that are not immediate (for lazy people like me) to get with simple commands:

    1. secret environment variable to connect to databases, APIs…
    2. different environments for development, testing, staging, production…

    Here comes wt-cli-workflow, or wtw.

    Setup Webtask Profile (for Node 8)

    wt init -p CHOOSE_A_NAME
    module.exports = function (cb) { cb(null, {versions: process.versions}) }
    wt create hello.js
    

    That won’t work cause is Node 8 code and wt containers by default are still Node 4.
    Follow this guide to migrate the profile to Node 8.

    Create a new Task

    wtw create myfile.js

    This will create a new function named “myfile-dev”, with a specific url that will look like this:
    https://XXX-some-code-XXX.sandbox.auth0-extend.com/myfile-dev
    And the .env file will be used

    To publish a different version for example to be used for testing

    wtw create myfile.js test

    This will create a new function named “myfile-test”, with a specific url that will look like this:
    https://XXX-some-code-XXX.sandbox.auth0-extend.com/myfile-test
    And the test.env file will be used

    Run a Task

    Run the file after it has already been created

    wtw run myfile.js

    This will update the myfile-dev version with the latest local code and will stay open to publish any new local changes

    Here as well, a second parameter will change the environment, affecting which .env file will be used and the remote URL

    Scheduled functions with cron

    Crete a function that with a specified schedule using cron

    wtw cron myfile.js "*/10 * * * *"

    That schedule mean every ten minues past the hour.
    Use Corntab to master cron 🙂

    More commands

    This improves the original ‘wt ls’ and ‘wt rm’ commands:

    wtw ls // accepts a search params that grep TS out of standard 'wt ls'
    wtw rm //accepts a series of webtasks named and removed them using basic 'wt rm'

    Please let me know what commands you would like to see, or feel free to fork and make pull requests 🙂

    Developers

    If you want to contribute to this project, here’s how

    Visit original content creator repository
    https://github.com/ildella/wt-cli-workflow

  • emacs-lispeed

    Emacs Lispeed

    A set of programs and Emacs packages that share same goal – making Emacs Lisp more efficient.

    Lispeed = Lisp + Speed
    

    Meta repository

    This repository is not intended for active development.
    What you can find here:

    • Project overview, as a whole.
    • High-level documentation.
    • Bundle of sources via submodules[1].
    • Utility scripts and other niceties.

    [1] You may want to clone all
    included repositories by yourself, from their upstreams.

    Project

    Emacs Lisp is slow.
    Even with byte code compilation and all optimizations byte-opt provide,
    it is slow.
    When code that is executed goes beyond some threshold of
    execution time, Emacs will hang for awhile due to it’s
    single-threaded nature.

    Emacs users can benefit from better optimized Emacs Lisp.
    It can reduce the amount and frequency of annoying freezes,
    which in turn makes Emacs more responsive.

    Lispeed is an attempt to improve builtin optimizer.
    n2o.el implements additional
    optimization levels after installed.

    In order to do better optimizations some issues must be solved:

    • Dynamic typing: typ.el library tries to infer arbitrary Emacs Lisp expression type.
    • Benchmark data analysis: benchstat.el integrates benchstat, so that it can be used for Emacs Lisp.
    • Idioms identification: eldb is a big Emacs Lisp corpus that can be queried.

    Getting the sources

    This repository uses submodules. Use instructions below to fetch submodules.

    # (1) With '--recursive' option:
    git clone --recursive https://github.com/Quasilyte/emacs-lispeed/
    
    # (2) Without '--recursive' option:
    git clone https://github.com/Quasilyte/emacs-lispeed/
    cd emacs-lispeed
    git submodule update --init --recursive

    Visit original content creator repository
    https://github.com/quasilyte/emacs-lispeed